配置飞书
1、在飞书开放平台中获取 App ID 和 App Secret
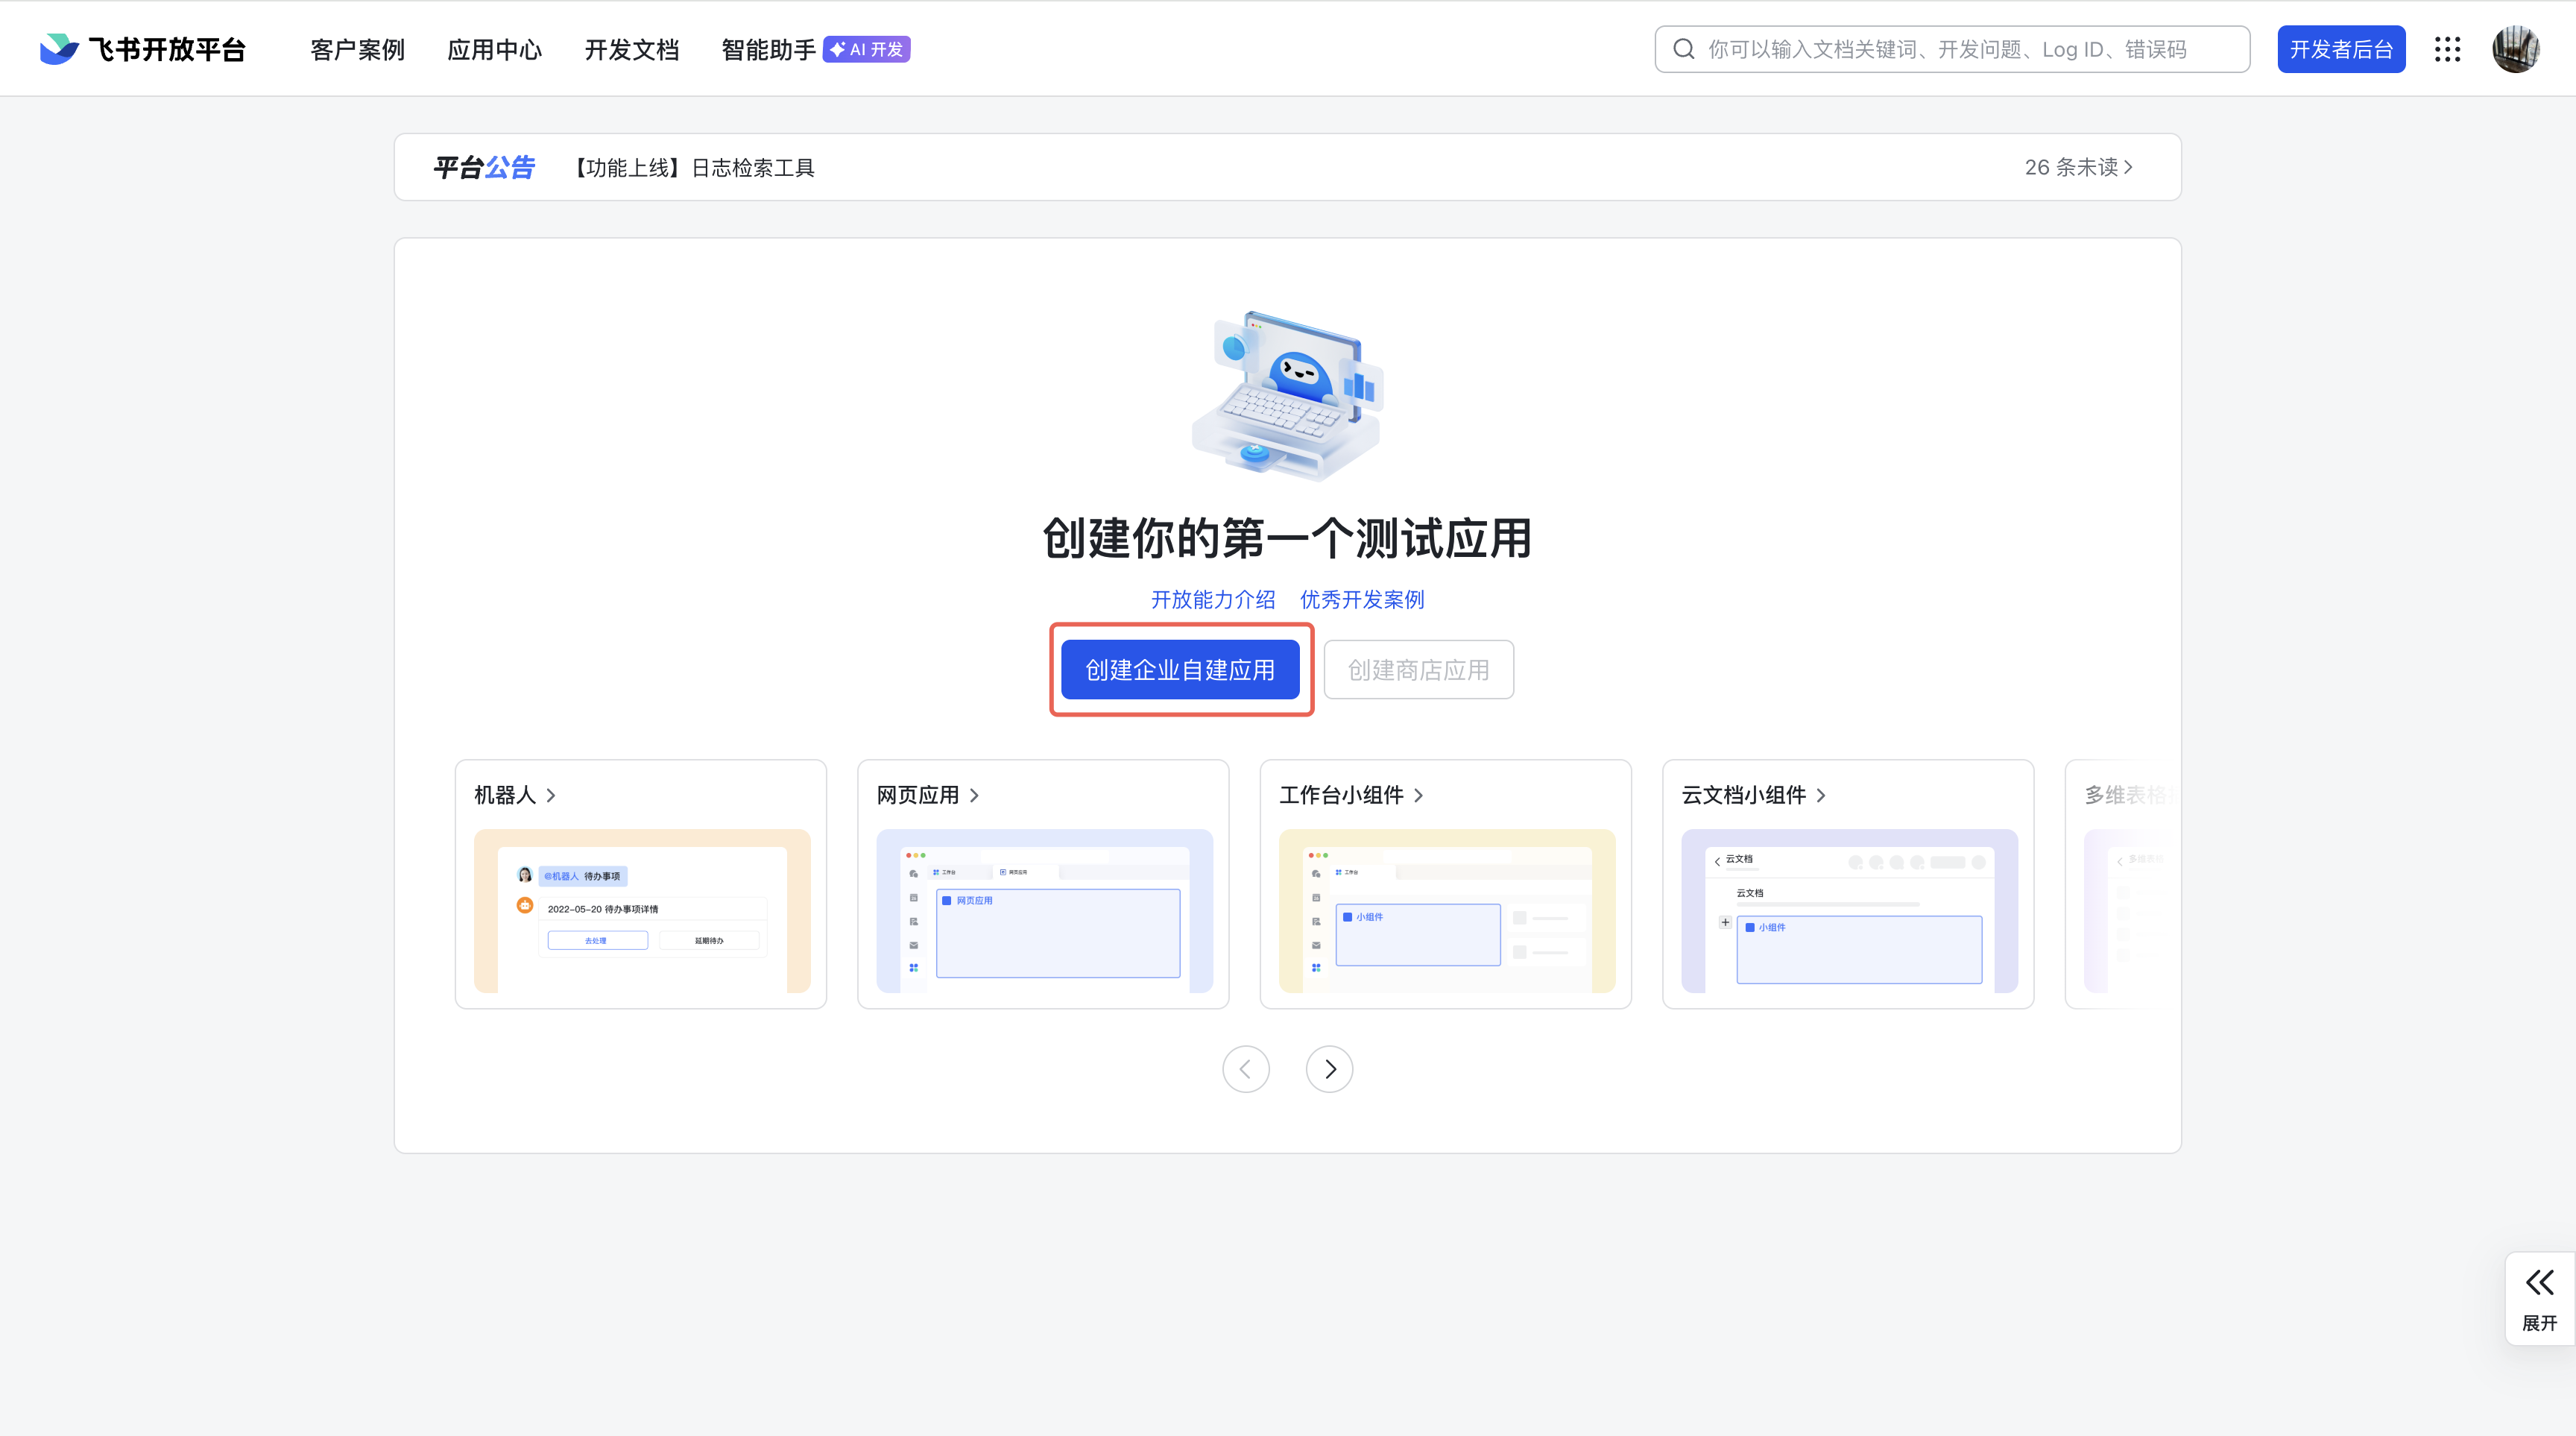
登录飞书账号(建议登录个人账号,如果是企业账号,后续步骤需要企业管理员审核),登录成功后,点击【创建企业自建应用】
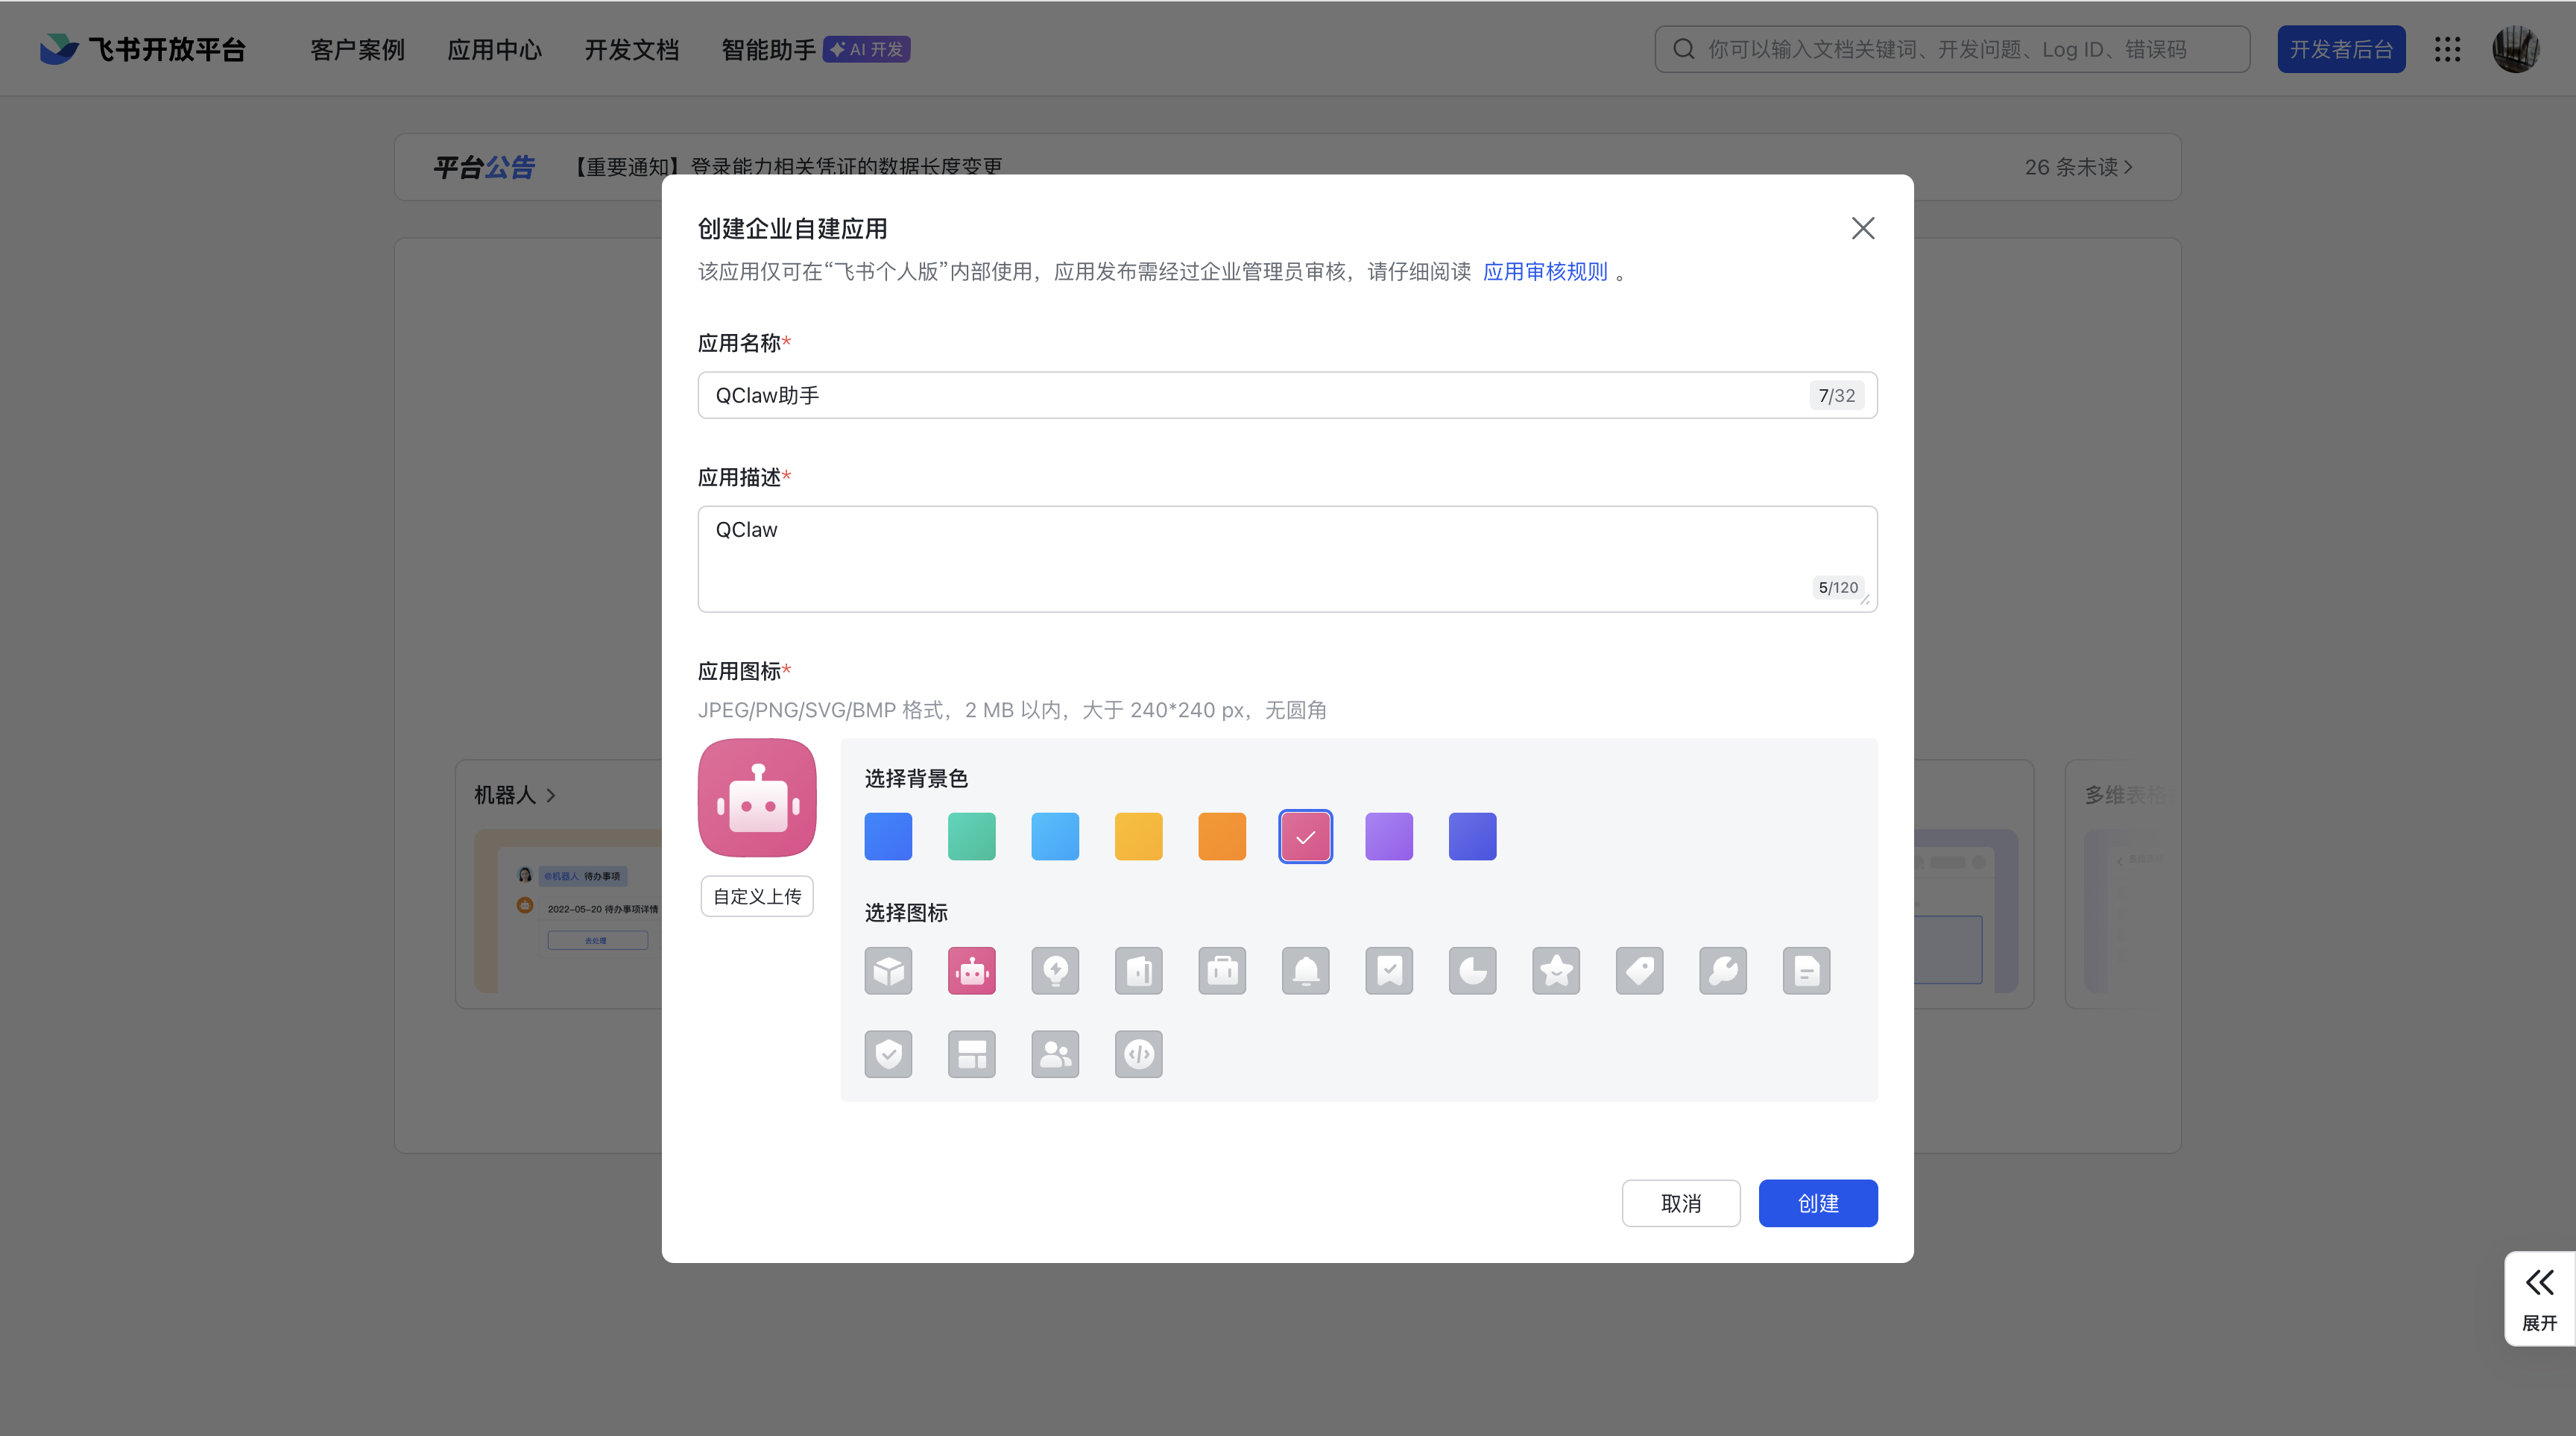
填写应用信息后,提交「创建」,应用创建成功后,会自动跳转到应用详情页面
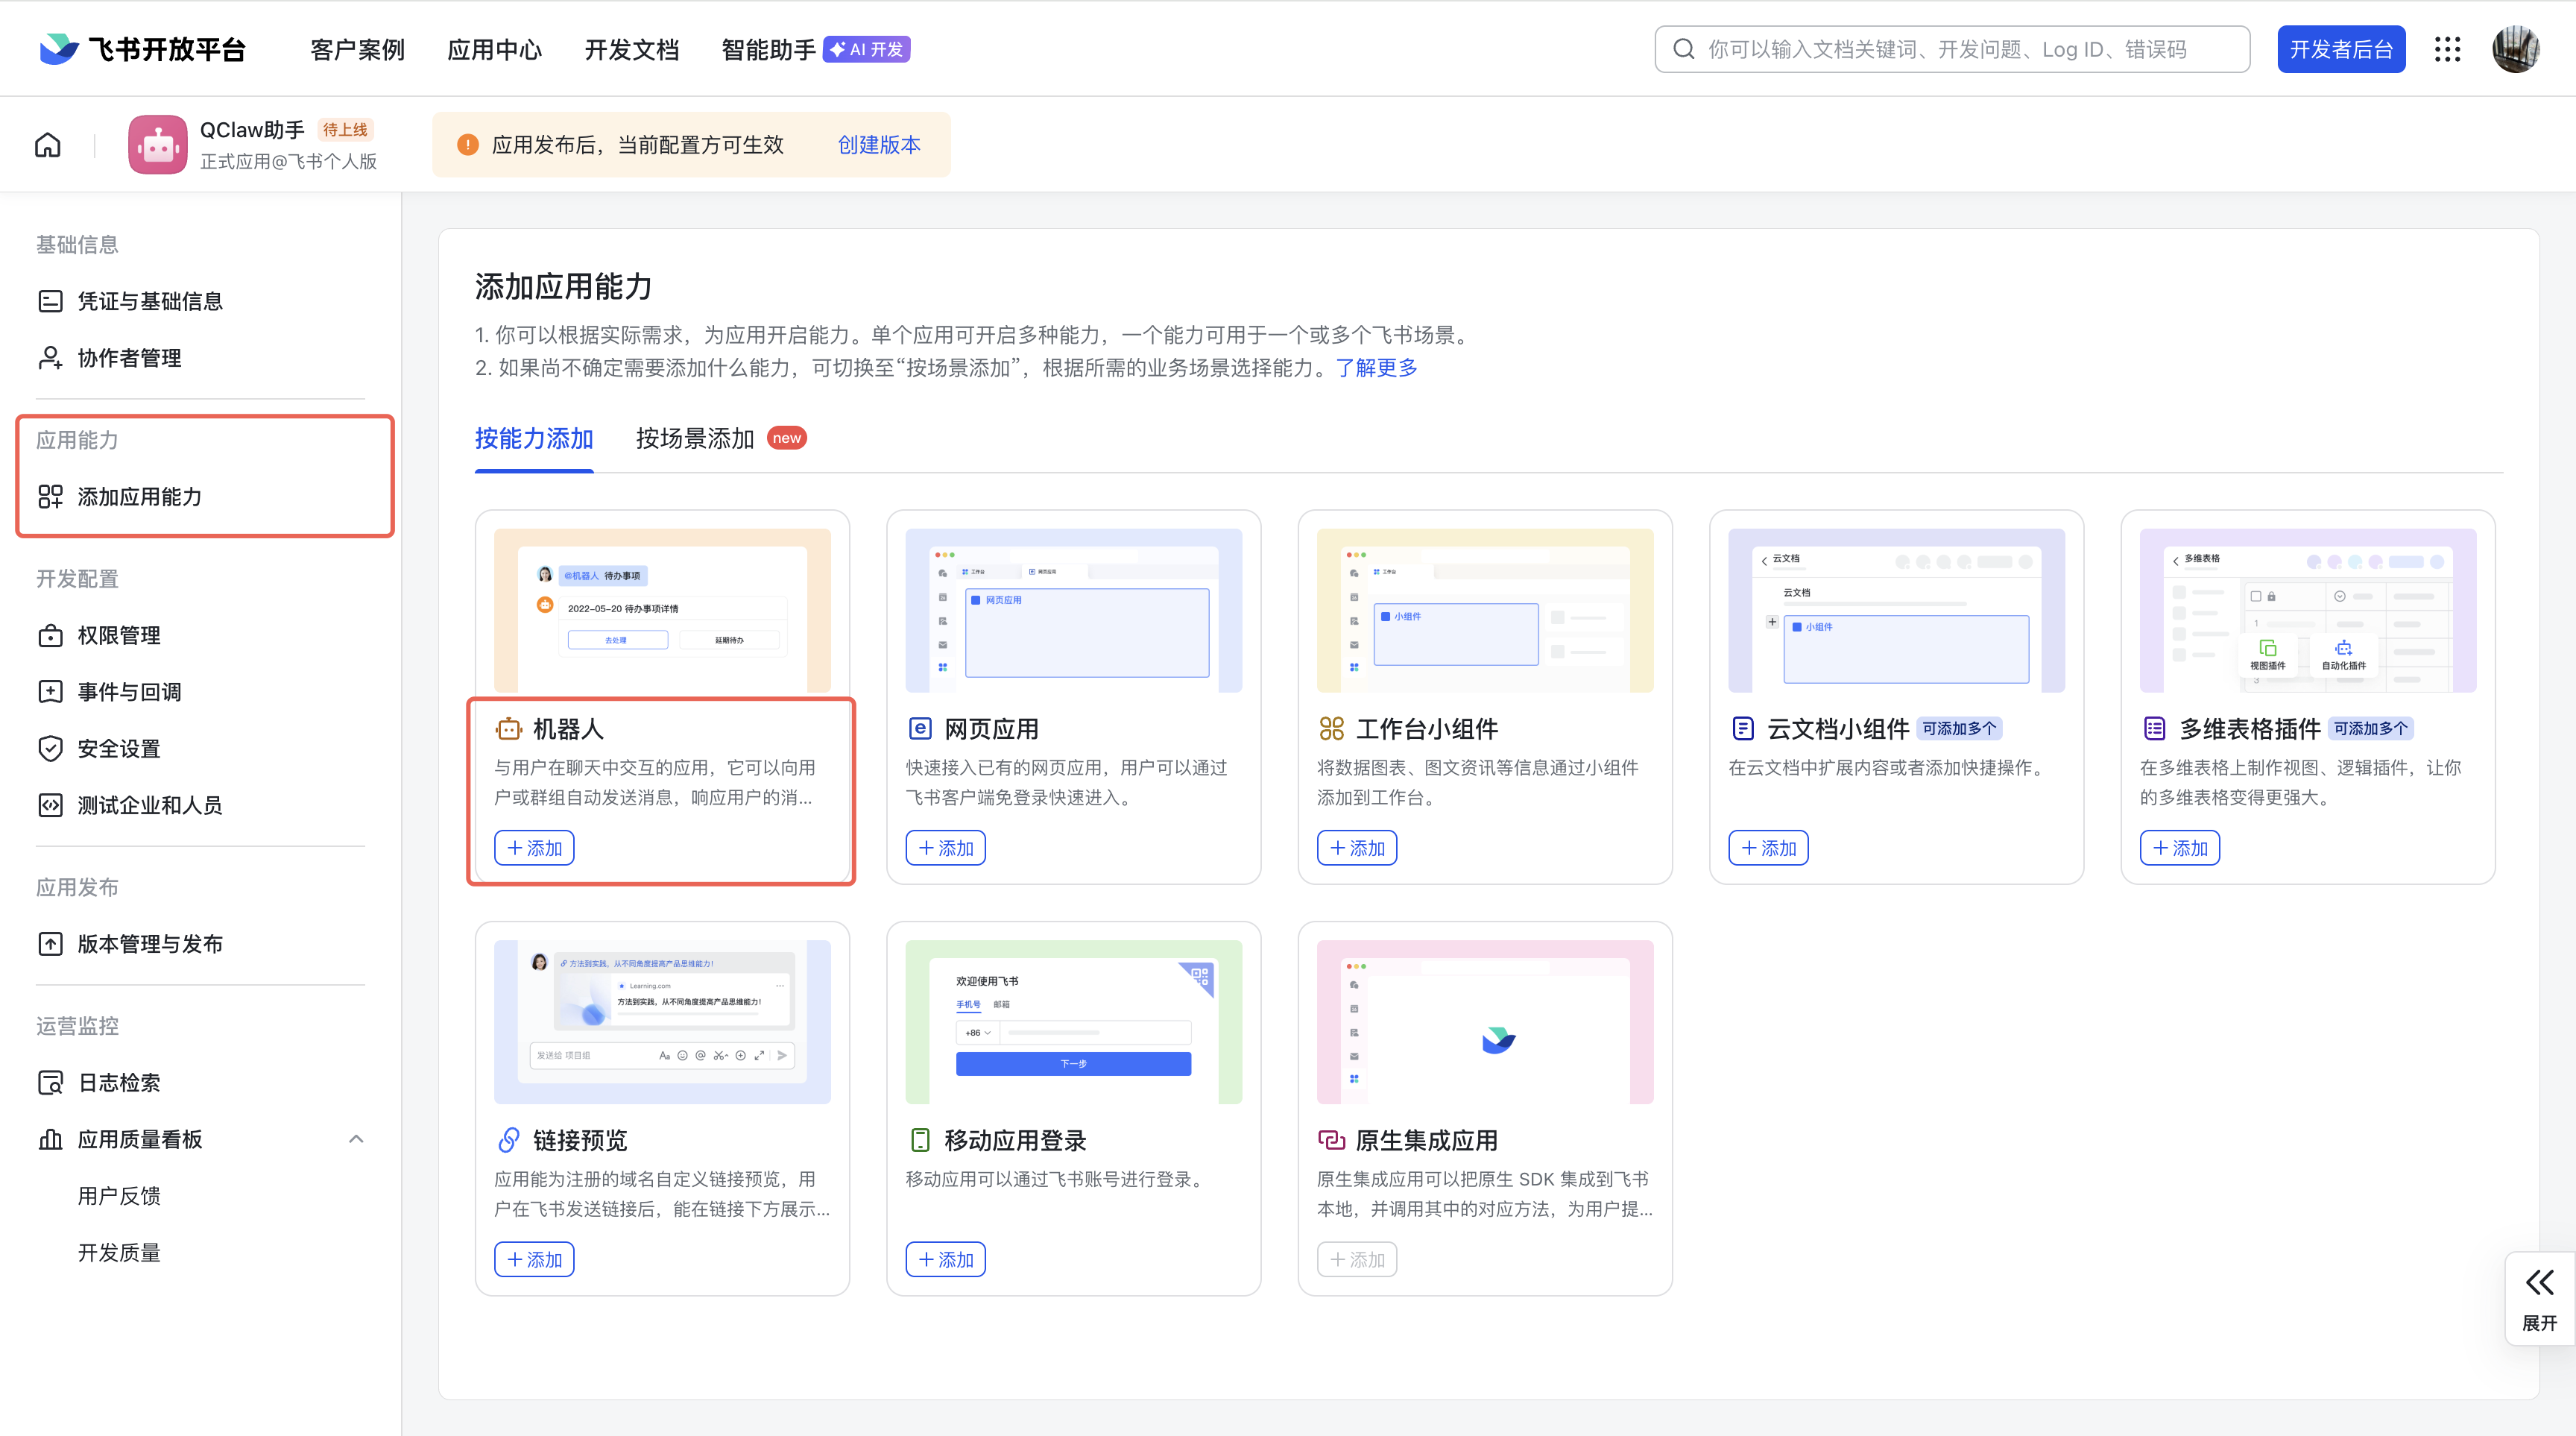
在应用详情页的「添加应用能力」区域,找到「机器人」卡片,点击「添加」。
在应用详情页左侧菜单中,点击「权限管理」,然后选择「批量导入 / 导出权限」。
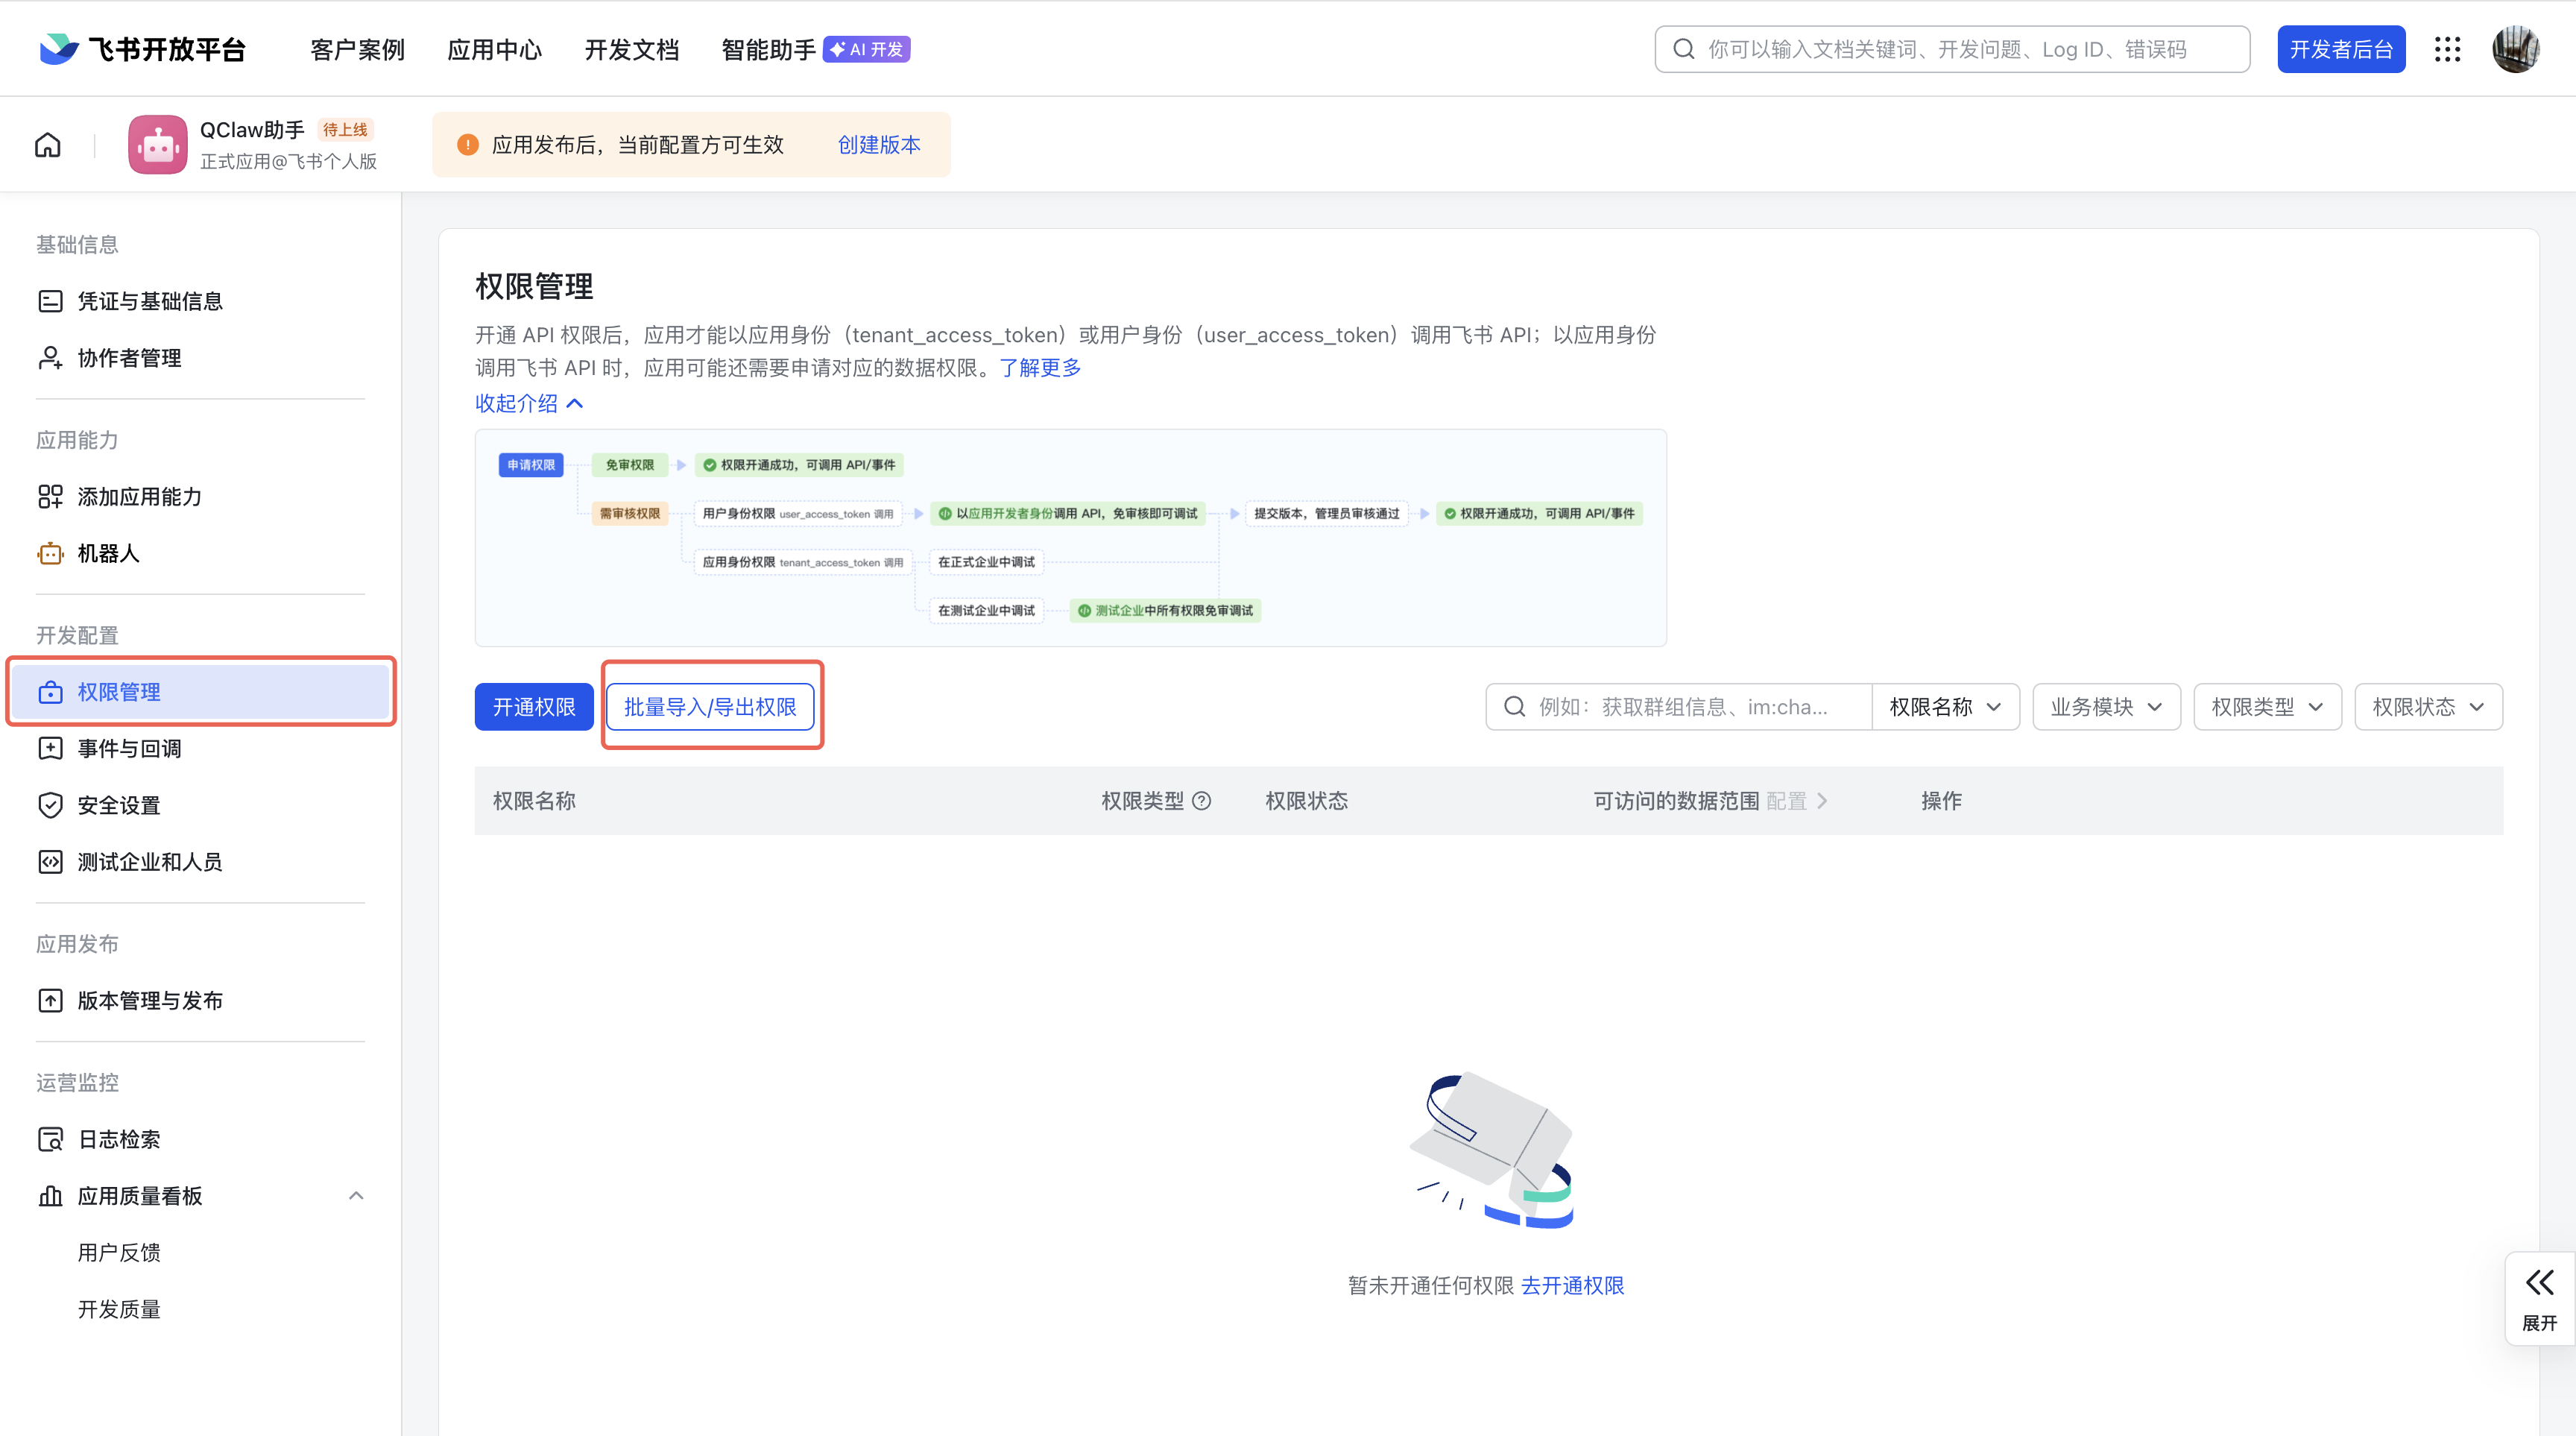
在弹出的窗口中:清空输入框中的所有内容,将下方的权限列表完整复制并粘贴进去,点击「下一步,确定新增权限」及「申请开通」。
json{ "scopes": { "tenant": ["contact:contact.base:readonly", "docx:document:readonly", "im:chat:read", "im:chat:update", "im:message.group_at_msg:readonly", "im:message.p2p_msg:readonly", "im:message.pins:read", "im:message.pins:write_only", "im:message.reactions:read", "im:message.reactions:write_only", "im:message:readonly", "im:message:recall", "im:message:send_as_bot", "im:message:send_multi_users", "im:message:send_sys_msg", "im:message:update", "im:resource", "application:application:self_manage", "cardkit:card:write", "cardkit:card:read"], "user": [ "contact:user.employee_id:readonly", "offline_access", "base:app:copy", "base:field:create", "base:field:delete", "base:field:read", "base:field:update", "base:record:create", "base:record:delete", "base:record:retrieve", "base:record:update", "base:table:create", "base:table:delete", "base:table:read", "base:table:update", "base:view:read", "base:view:write_only", "base:app:create", "base:app:update", "base:app:read", "board:whiteboard:node:create", "board:whiteboard:node:read", "calendar:calendar:read", "calendar:calendar.event:create", "calendar:calendar.event:delete", "calendar:calendar.event:read", "calendar:calendar.event:reply", "calendar:calendar.event:update", "calendar:calendar.free_busy:read", "contact:contact.base:readonly", "contact:user.base:readonly", "contact:user:search", "docs:document.comment:create", "docs:document.comment:read", "docs:document.comment:update", "docs:document.media:download", "docs:document:copy", "docx:document:create", "docx:document:readonly", "docx:document:write_only", "drive:drive.metadata:readonly", "drive:file:download", "drive:file:upload", "im:chat.members:read", "im:chat:read", "im:message", "im:message.group_msg:get_as_user", "im:message.p2p_msg:get_as_user", "im:message:readonly", "search:docs:read", "search:message", "space:document:delete", "space:document:move", "space:document:retrieve", "task:comment:read", "task:comment:write", "task:task:read", "task:task:write", "task:task:writeonly", "task:tasklist:read", "task:tasklist:write", "wiki:node:copy", "wiki:node:create", "wiki:node:move", "wiki:node:read", "wiki:node:retrieve", "wiki:space:read", "wiki:space:retrieve", "wiki:space:write_only" ] } }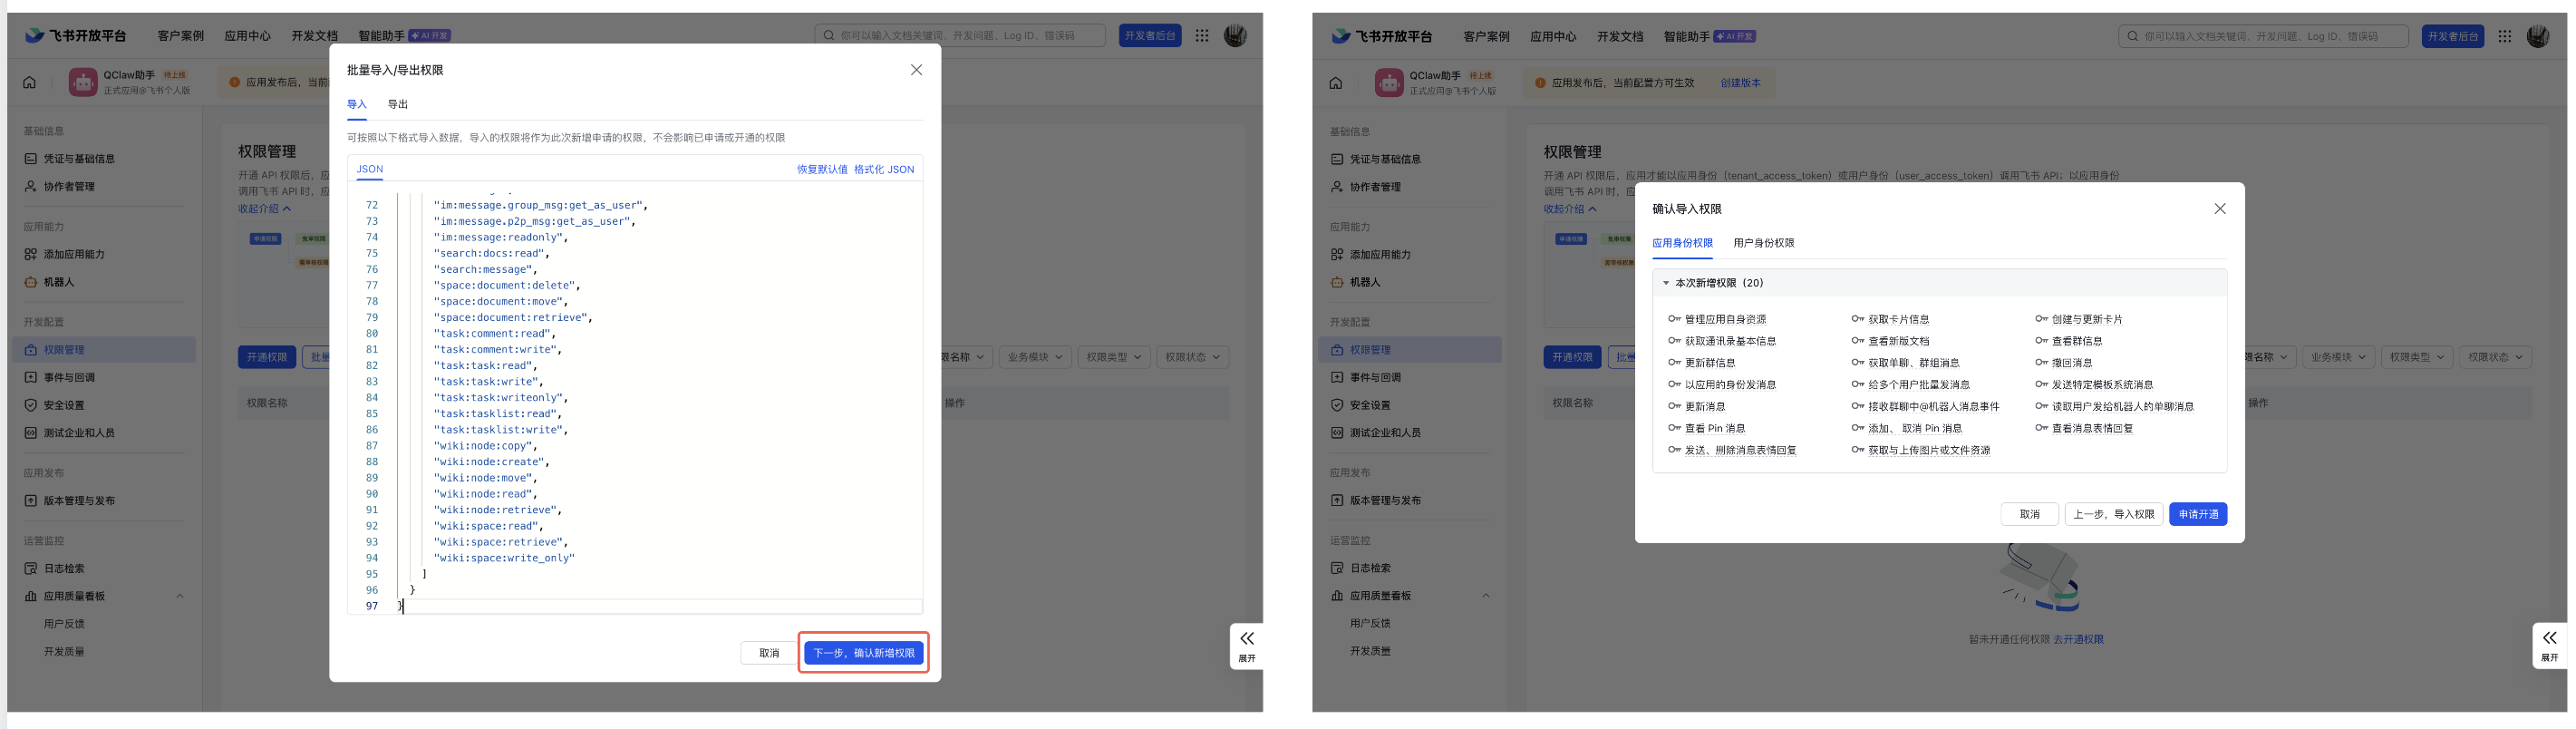
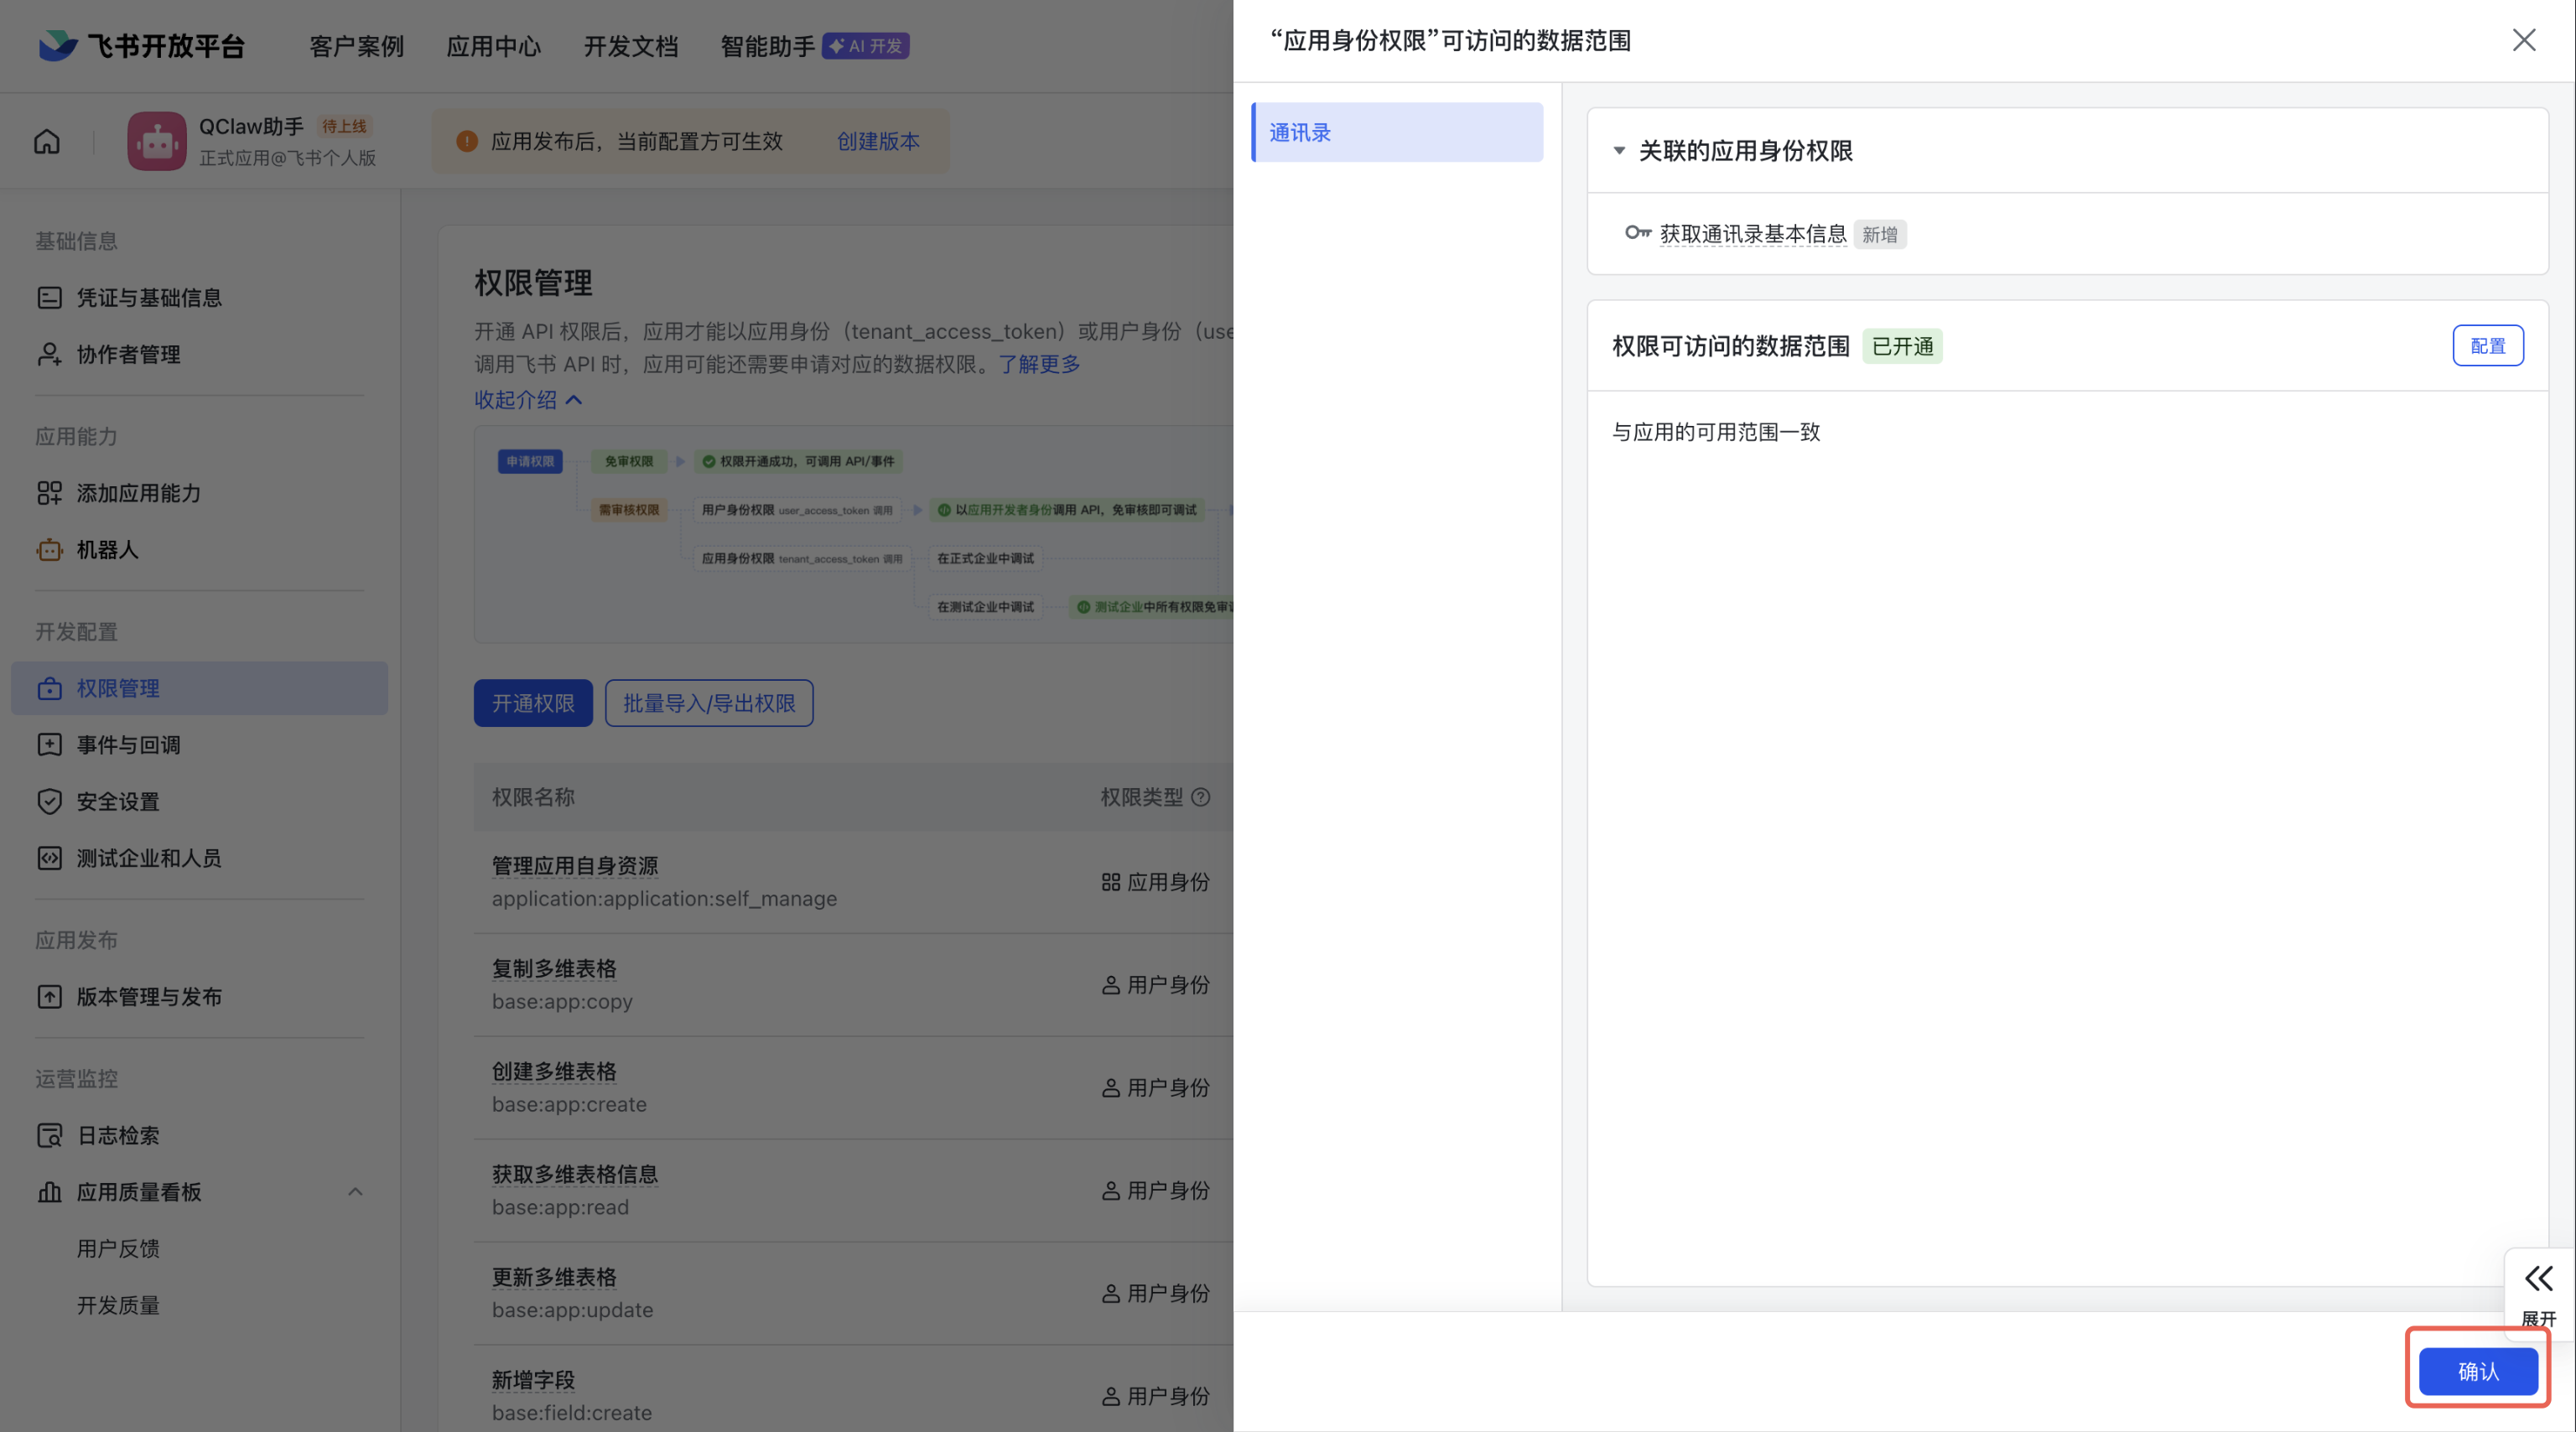
等待几秒钟,页面会显示权限已成功添加,点击右下角「确认」。
在应用详情页左侧菜单中,点击「凭证与基础信息」。在页面中,即可获取App ID 和 App Secret
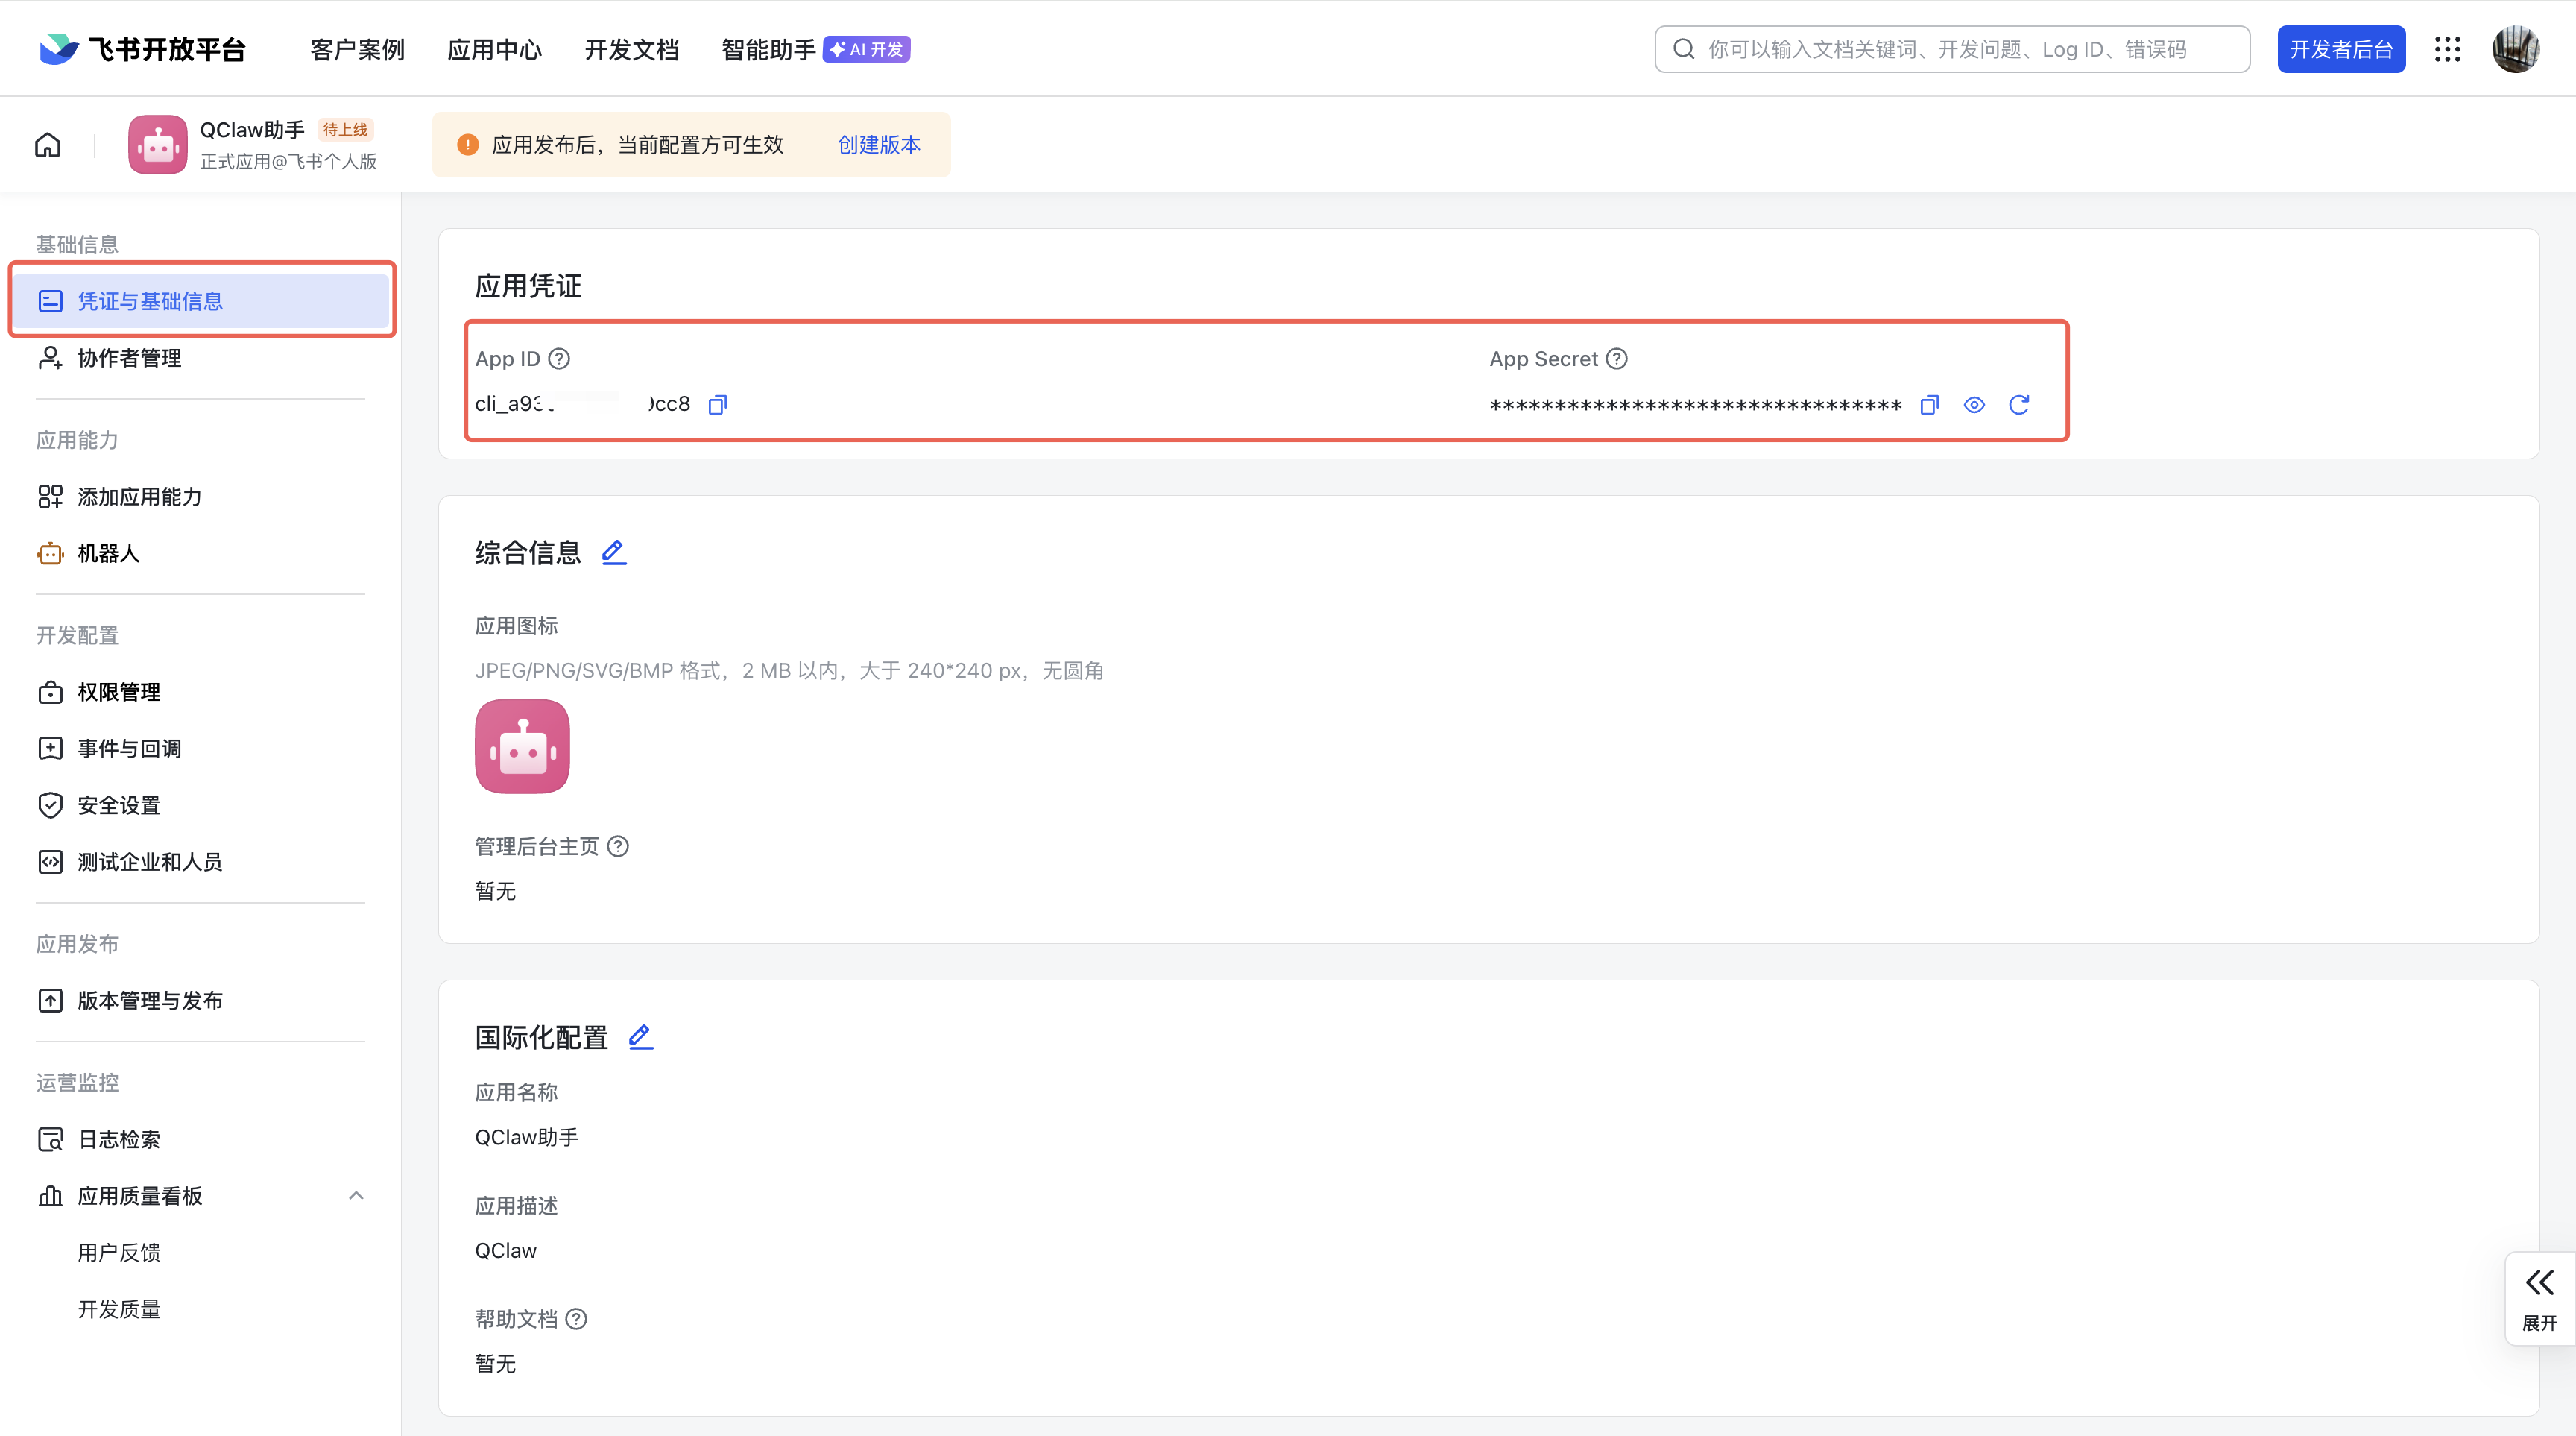
TIP
到此就获取到了初始化OpenClaw时,连接飞书的 密钥 和 应用ID!
2、关联飞书与OpenClaw
# 删除旧飞书对话应用
openclaw channels remove feishu
# 重新添加对话应用
openclaw channels addagent ➜ .openclaw openclaw channels add
🦞 OpenClaw 2026.3.23-2 (7ffe7e4) — Less clicking, more shipping, fewer "where did that file go" moments.
┌ Channel setup
11:24:04 [plugins] feishu_doc: Registered feishu_doc, feishu_app_scopes
11:24:04 [plugins] feishu_chat: Registered feishu_chat tool
11:24:04 [plugins] feishu_wiki: Registered feishu_wiki tool
11:24:04 [plugins] feishu_drive: Registered feishu_drive tool
11:24:04 [plugins] feishu_bitable: Registered bitable tools
[info]: [ 'client ready' ]
11:24:05 [plugins] feishu_doc: Registered feishu_doc, feishu_app_scopes
11:24:05 [plugins] feishu_chat: Registered feishu_chat tool
11:24:05 [plugins] feishu_wiki: Registered feishu_wiki tool
11:24:05 [plugins] feishu_drive: Registered feishu_drive tool
11:24:05 [plugins] feishu_bitable: Registered bitable tools
11:24:06 [plugins] feishu_doc: Registered feishu_doc, feishu_app_scopes
11:24:06 [plugins] feishu_chat: Registered feishu_chat tool
11:24:06 [plugins] feishu_wiki: Registered feishu_wiki tool
11:24:06 [plugins] feishu_drive: Registered feishu_drive tool
11:24:06 [plugins] feishu_bitable: Registered bitable tools
│
◇ Channel status ───────────────────────────────────────────╮
│ │
│ Telegram: needs token │
│ Discord: needs token │
│ IRC: needs host + nick │
│ Slack: needs tokens │
│ Signal: needs setup │
│ signal-cli: missing (signal-cli) │
│ iMessage: needs setup │
│ imsg: missing (imsg) │
│ LINE: needs token + secret │
│ Accounts: 0 │
│ Feishu: connected as ou_25a7d1506f91848dbaf8b27e94fa71fa │
│ WhatsApp: not configured │
│ Google Chat: not configured │
│ Google Chat: installed │
│ Nostr: installed │
│ Microsoft Teams: installed │
│ Mattermost: installed │
│ Nextcloud Talk: installed │
│ Matrix: installed │
│ BlueBubbles: installed │
│ Zalo: installed │
│ Zalo Personal: installed │
│ Synology Chat: installed │
│ Tlon: installed │
│ Twitch: installed │
│ WhatsApp: installed │
│ │
├────────────────────────────────────────────────────────────╯
│
◇ Configure chat channels now?
│ Yes
│
◇ How channels work ───────────────────────────────────────────────────────────────────────╮
│ │
│ DM security: default is pairing; unknown DMs get a pairing code. │
│ Approve with: openclaw pairing approve <channel> <code> │
│ Public DMs require dmPolicy="open" + allowFrom=["*"]. │
│ Multi-user DMs: run: openclaw config set session.dmScope "per-channel-peer" (or │
│ "per-account-channel-peer" for multi-account channels) to isolate sessions. │
│ Docs: channels/pairing │
│ │
│ Telegram: simplest way to get started — register a bot with @BotFather and get going. │
│ WhatsApp: works with your own number; recommend a separate phone + eSIM. │
│ Discord: very well supported right now. │
│ IRC: classic IRC networks with DM/channel routing and pairing controls. │
│ Google Chat: Google Workspace Chat app with HTTP webhook. │
│ Slack: supported (Socket Mode). │
│ Signal: signal-cli linked device; more setup (David Reagans: "Hop on Discord."). │
│ iMessage: this is still a work in progress. │
│ LINE: LINE Messaging API webhook bot. │
│ Feishu: 飞书/Lark enterprise messaging. │
│ Nostr: Decentralized protocol; encrypted DMs via NIP-04. │
│ Microsoft Teams: Bot Framework; enterprise support. │
│ Mattermost: self-hosted Slack-style chat; install the plugin to enable. │
│ Nextcloud Talk: Self-hosted chat via Nextcloud Talk webhook bots. │
│ Matrix: open protocol; install the plugin to enable. │
│ BlueBubbles: iMessage via the BlueBubbles mac app + REST API. │
│ Zalo: Vietnam-focused messaging platform with Bot API. │
│ Zalo Personal: Zalo personal account via QR code login. │
│ Synology Chat: Connect your Synology NAS Chat to OpenClaw with full agent capabilities. │
│ Tlon: decentralized messaging on Urbit; install the plugin to enable. │
│ Twitch: Twitch chat integration │
│ │
├───────────────────────────────────────────────────────────────────────────────────────────╯
│
◇ Select a channel
│ Feishu/Lark (飞书)
│
◇ Feishu already configured. What do you want to do?
│ Modify settings
│
◇ How do you want to provide this App Secret?
│ Enter App Secret
│
◇ Feishu App Secret already configured. Keep it?
│ No
│
◇ Enter Feishu App Secret
│ EbdrZr4aiYMTQcB3z2OiUgKm8Mw3yBE5
│
◇ Enter Feishu App ID
│ cli_a9487e84f3b8dcd3
│
◇ Feishu connection test ───────────────────────────╮
│ │
│ Connected as ou_25a7d1506f91848dbaf8b27e94fa71fa │
│ │
├────────────────────────────────────────────────────╯
│
◇ Feishu connection mode
│ WebSocket (default)
│
◇ Which Feishu domain?
│ Feishu (feishu.cn) - China
│
◇ Group chat policy
│ Allowlist - only respond in specific groups
│
◇ Group chat allowlist (chat_ids)
│
│
◇ Select a channel
│ Finished
│
◇ Selected channels ──────────────────────────────────────────╮
│ │
│ Feishu — 飞书/Lark enterprise messaging. Docs: │
│ feishu │
│ │
├──────────────────────────────────────────────────────────────╯
│
◇ Configure DM access policies now? (default: pairing)
│ Yes
│
◇ Feishu DM access ─────────────────────────────────────────────────────────────────────────╮
│ │
│ Default: pairing (unknown DMs get a pairing code). │
│ Approve: openclaw pairing approve feishu <code> │
│ Allowlist DMs: channels.feishu.dmPolicy="allowlist" + channels.feishu.allowFrom entries. │
│ Public DMs: channels.feishu.dmPolicy="open" + channels.feishu.allowFrom includes "*". │
│ Multi-user DMs: run: openclaw config set session.dmScope "per-channel-peer" (or │
│ "per-account-channel-peer" for multi-account channels) to isolate sessions. │
│ Docs: channels/pairing │
│ │
├────────────────────────────────────────────────────────────────────────────────────────────╯
│
◇ Feishu DM policy
│ Open (public inbound DMs)
│
◇ Add display names for these accounts? (optional)
│ Yes
│
◇ feishu account name (default)
│ OpenClaw Baby
│
◇ Bind configured channel accounts to agents now?
│ Yes
│
◇ Route feishu account "default" to agent
│ main (default)
│
◇ Routing bindings ────────────────╮
│ │
│ Added: feishu accountId=default │
│ │
├───────────────────────────────────╯
Config overwrite: /home/agent/.openclaw/openclaw.json (sha256 61fe9dc357ef80caef5c5dcf81f040995f7395089535c73b7b086174331bf6c9 -> cebcd2776e988ebe76e754d762b0ddaae69d36b19431f0777f427bff7f03dd85, backup=/home/agent/.openclaw/openclaw.json.bak)
│
└ Channels updated.
agent ➜ .openclawsystemctl --user restart openclaw-gateway.service3、飞书应用创建版本
注意
OpenClaw配置时与飞书连接成功后,还需要返回飞书创建版本并审核通过,才可以成功实现信息互通
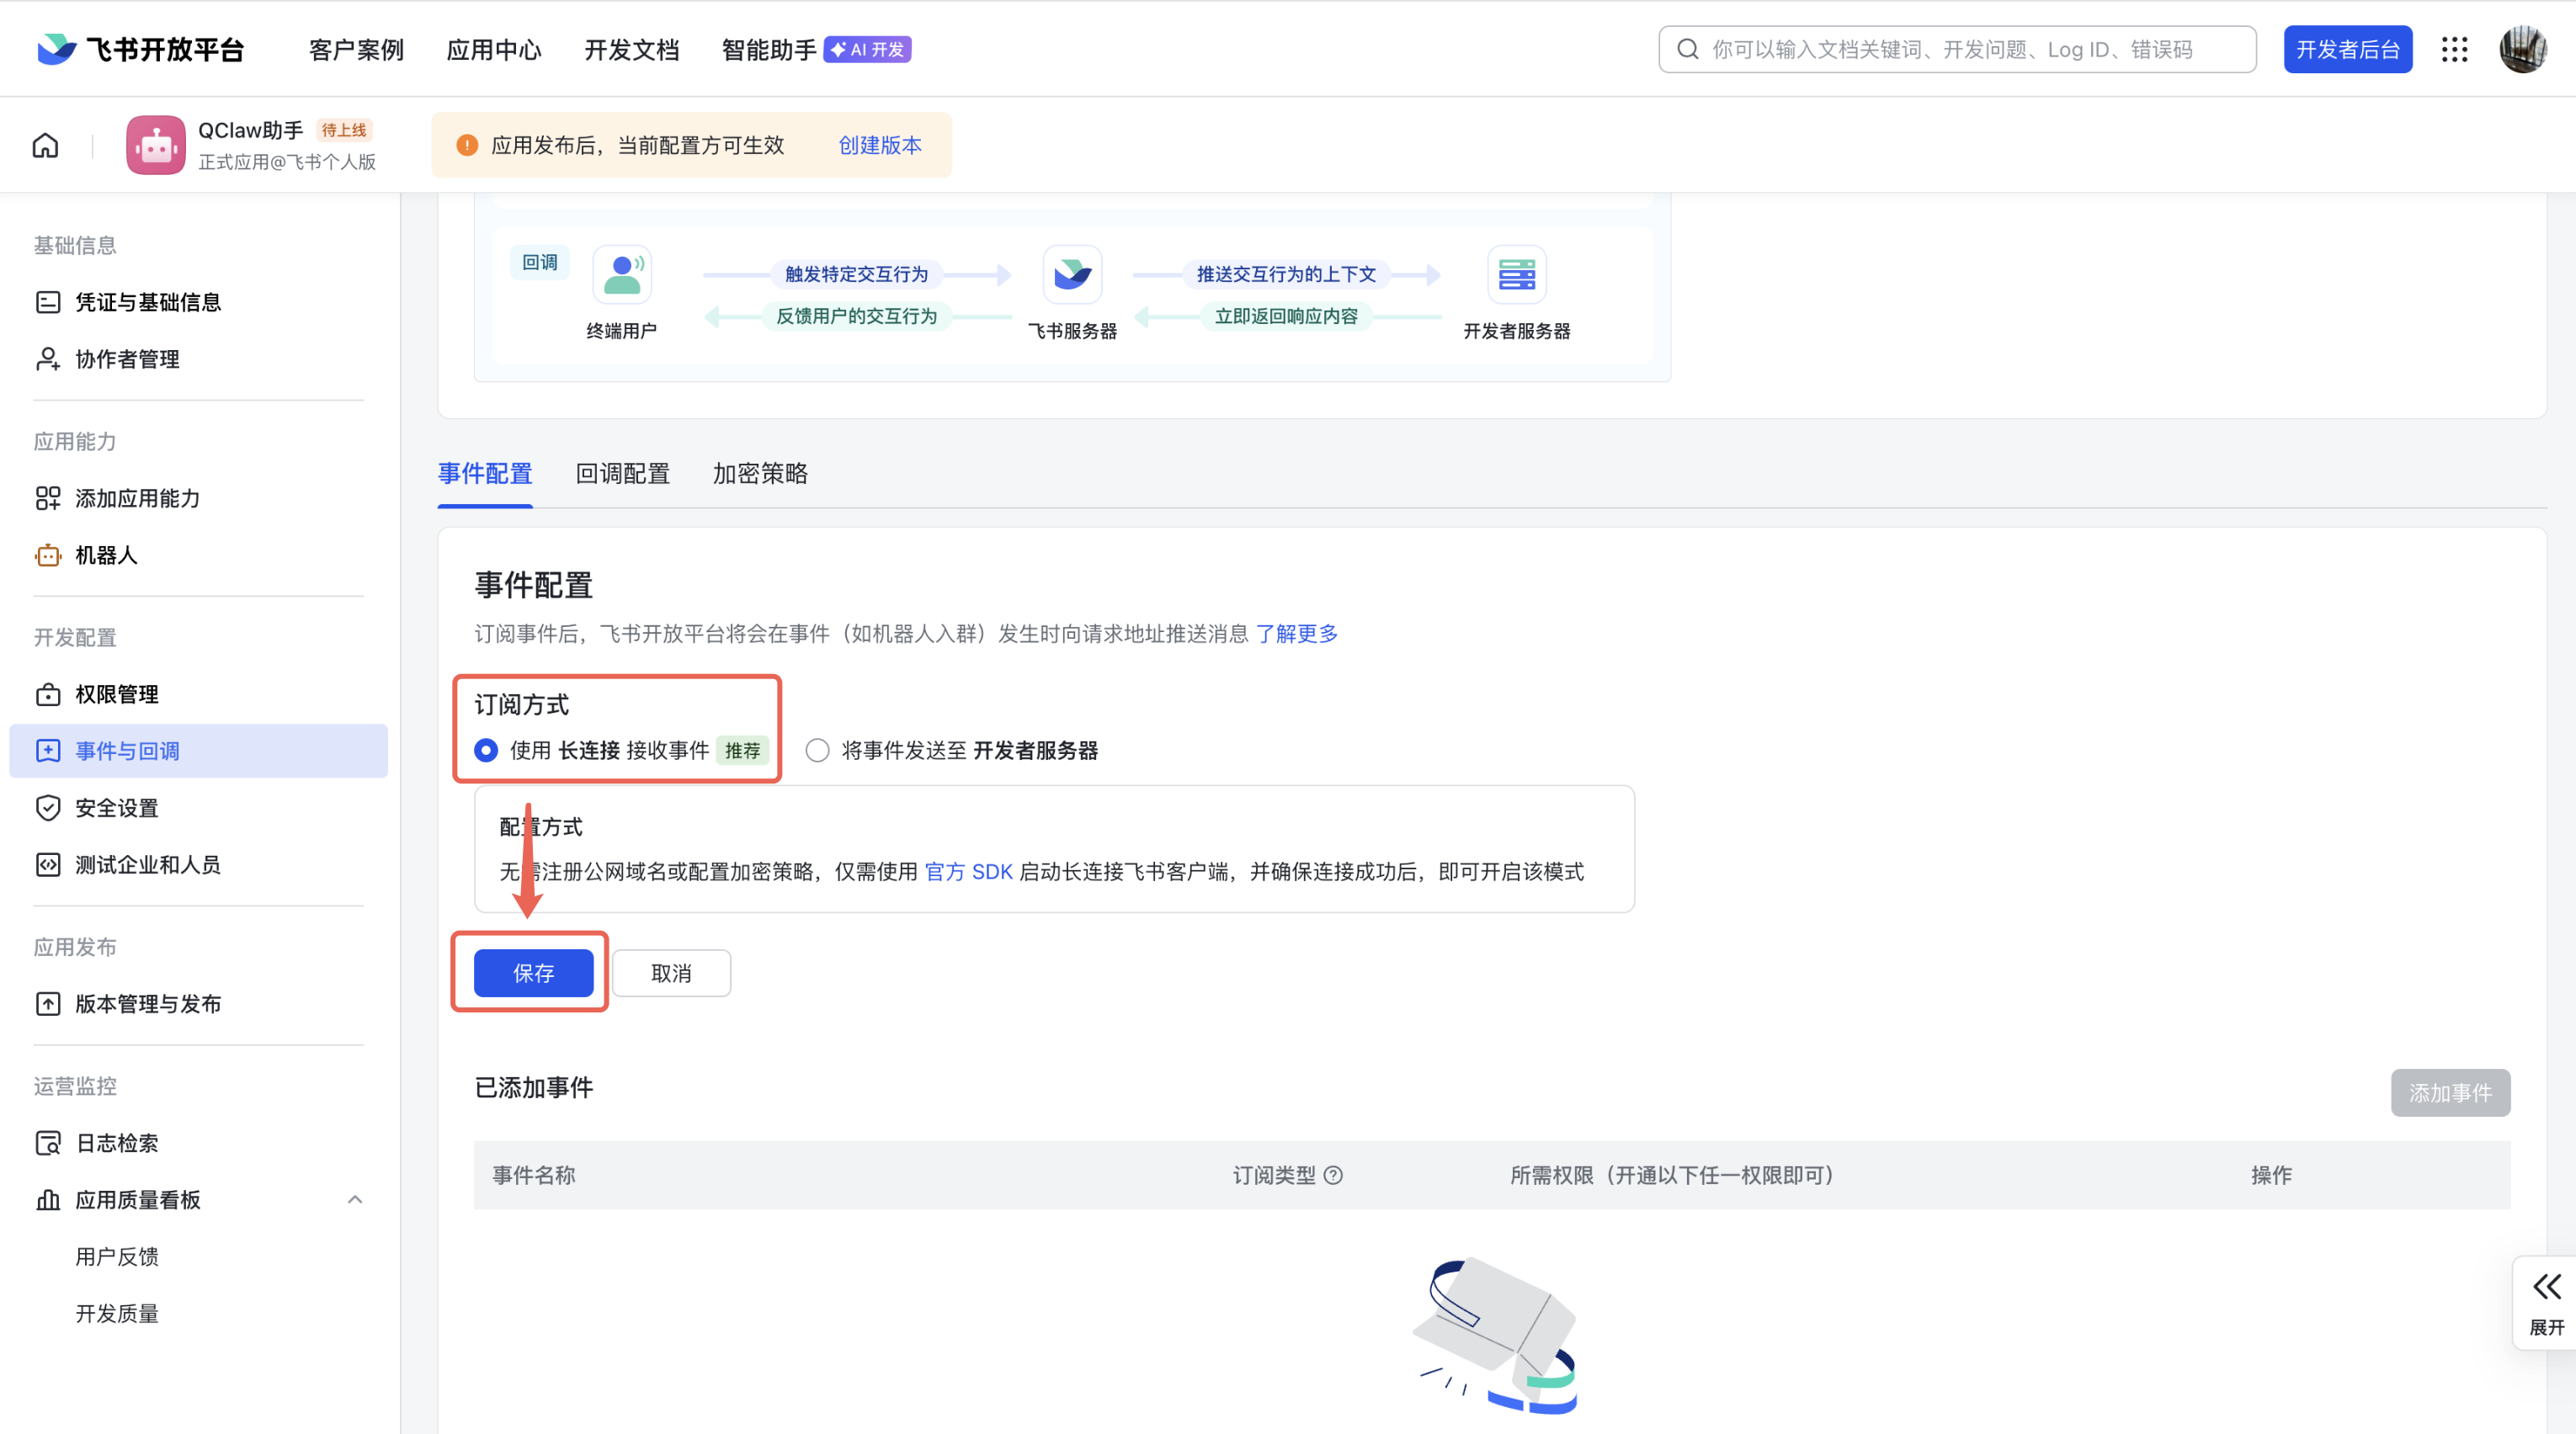
配置飞书事件回调(需要告诉飞书将消息发送到哪里):返回飞书开放平台,进入应用详情页,在左侧菜单中,点击「事件与回调」,点击订阅方式旁编辑按钮
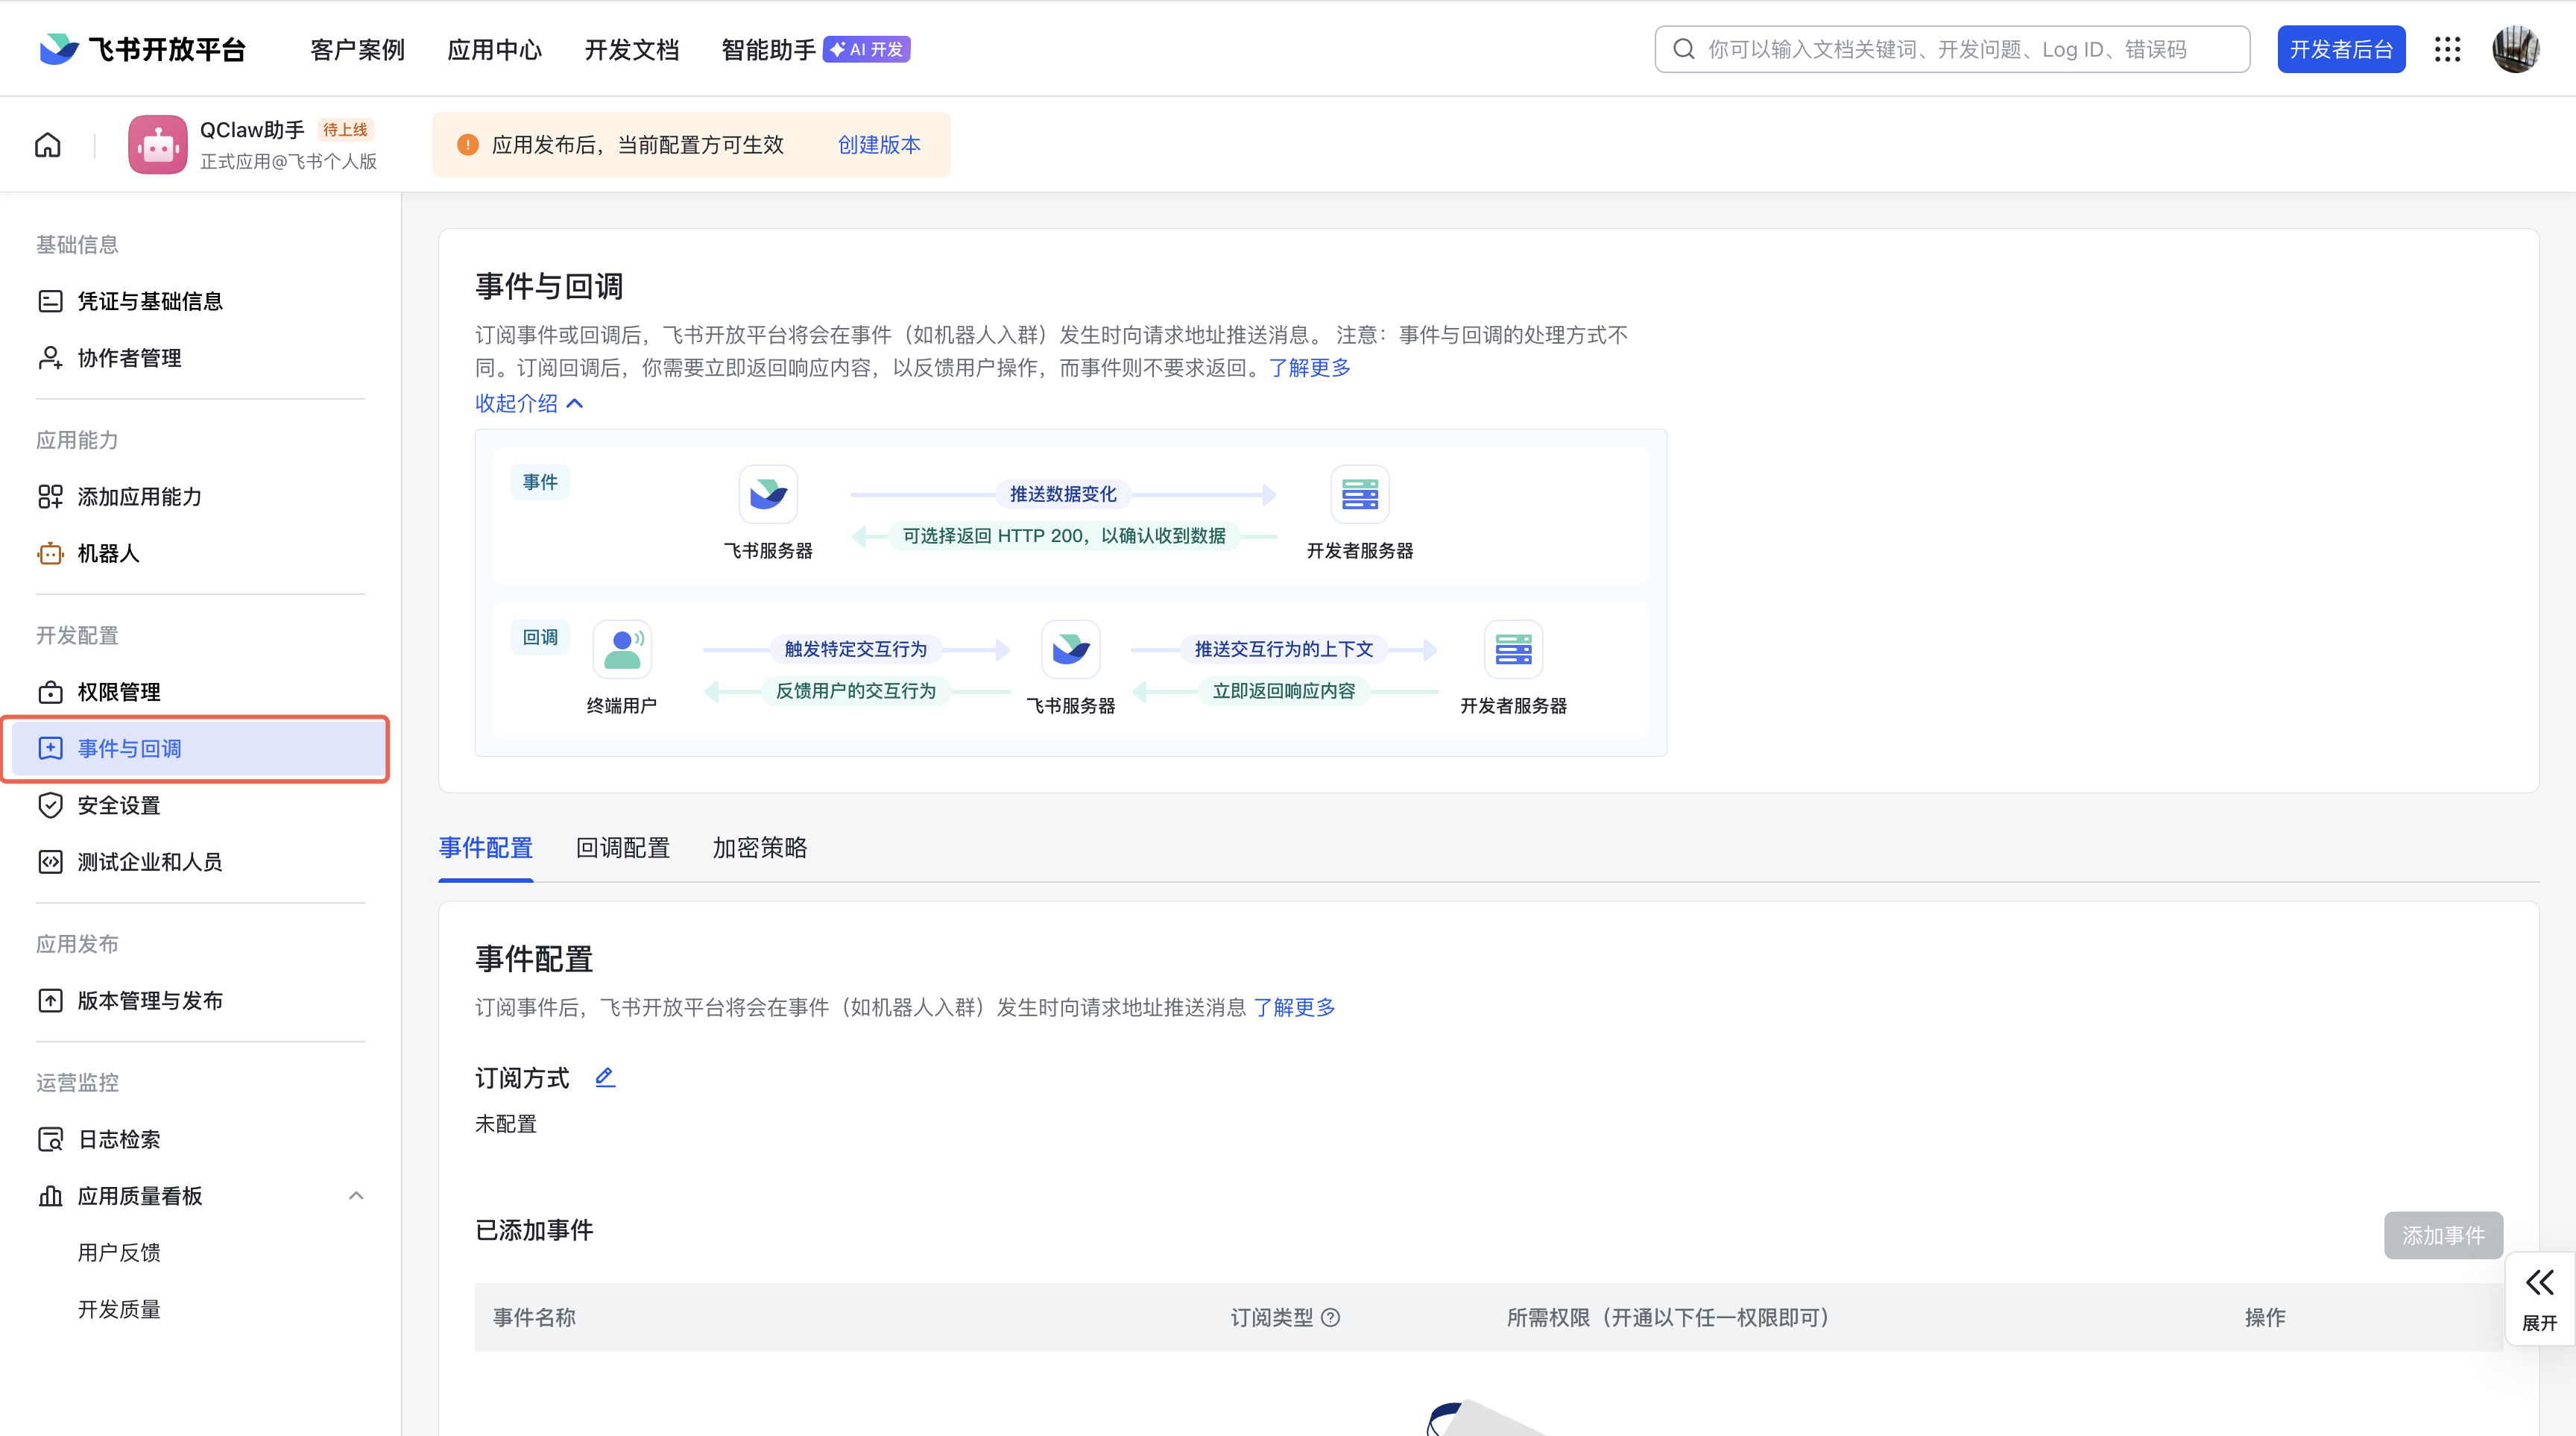
选择订阅方式为「使用 长连接 接收事件」,再点击「保存」
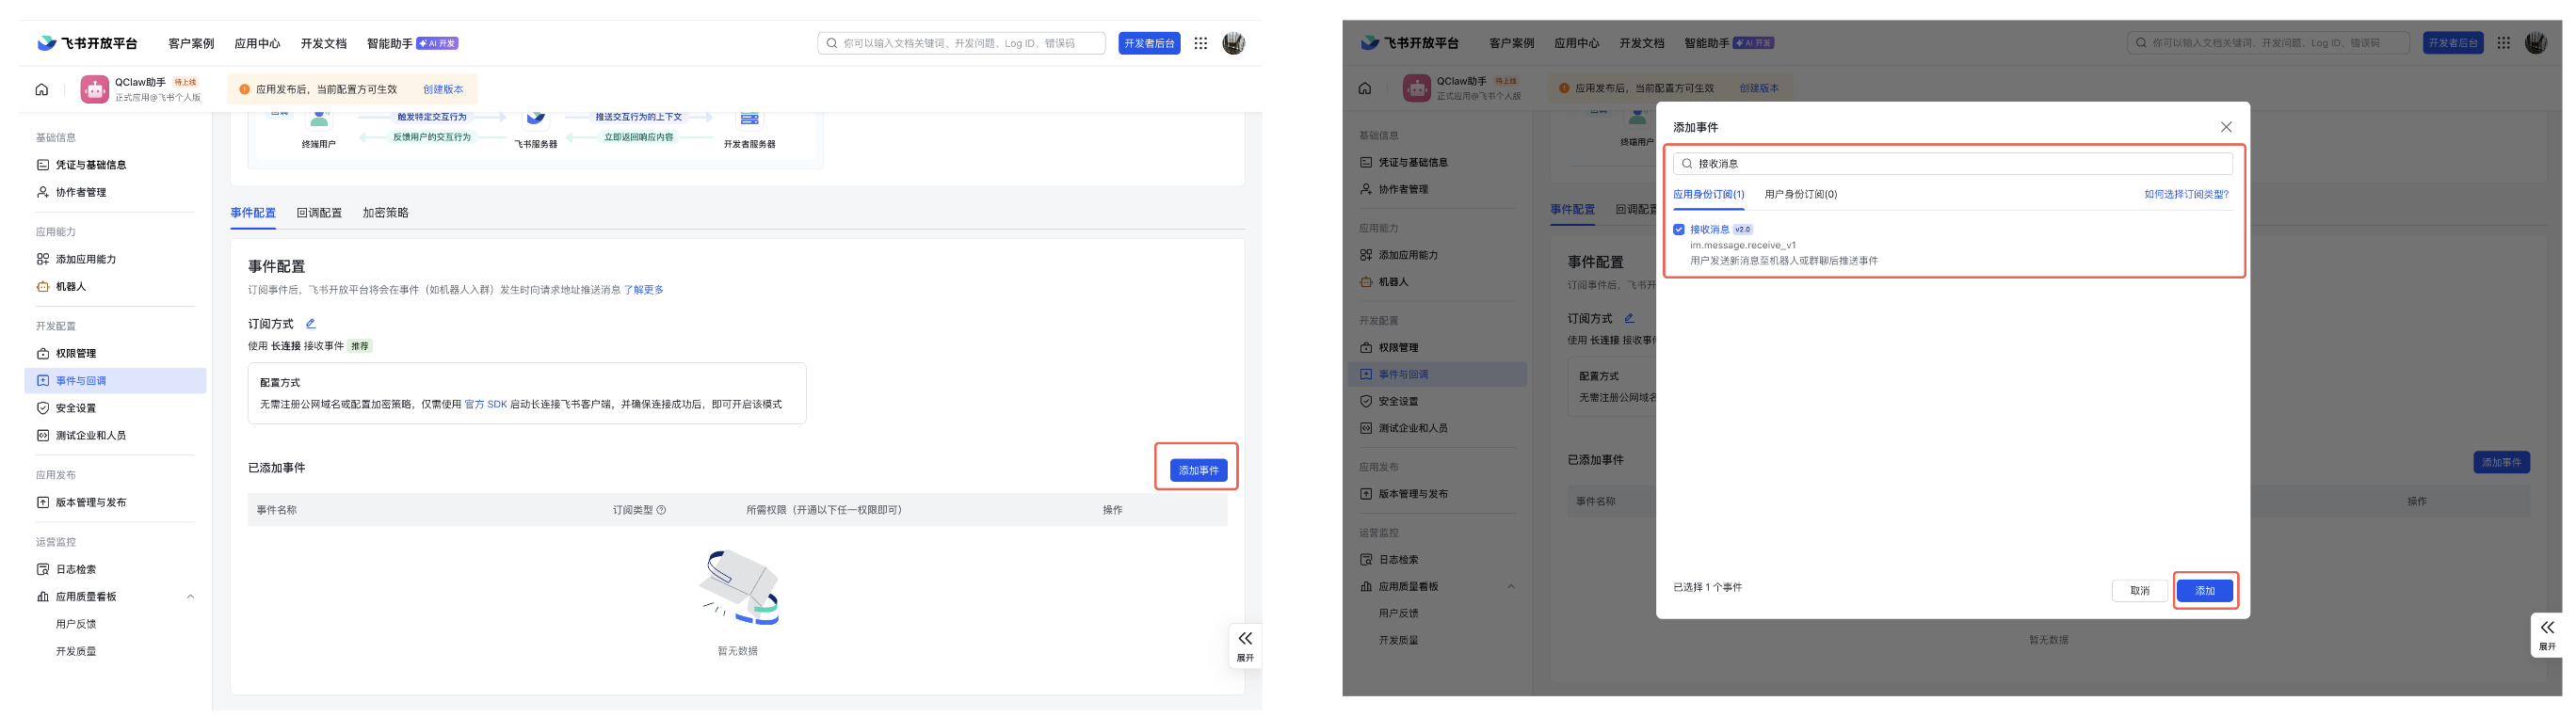
在「事件配置」区域,点击「添加事件」,搜索并添加「接收消息」事件。
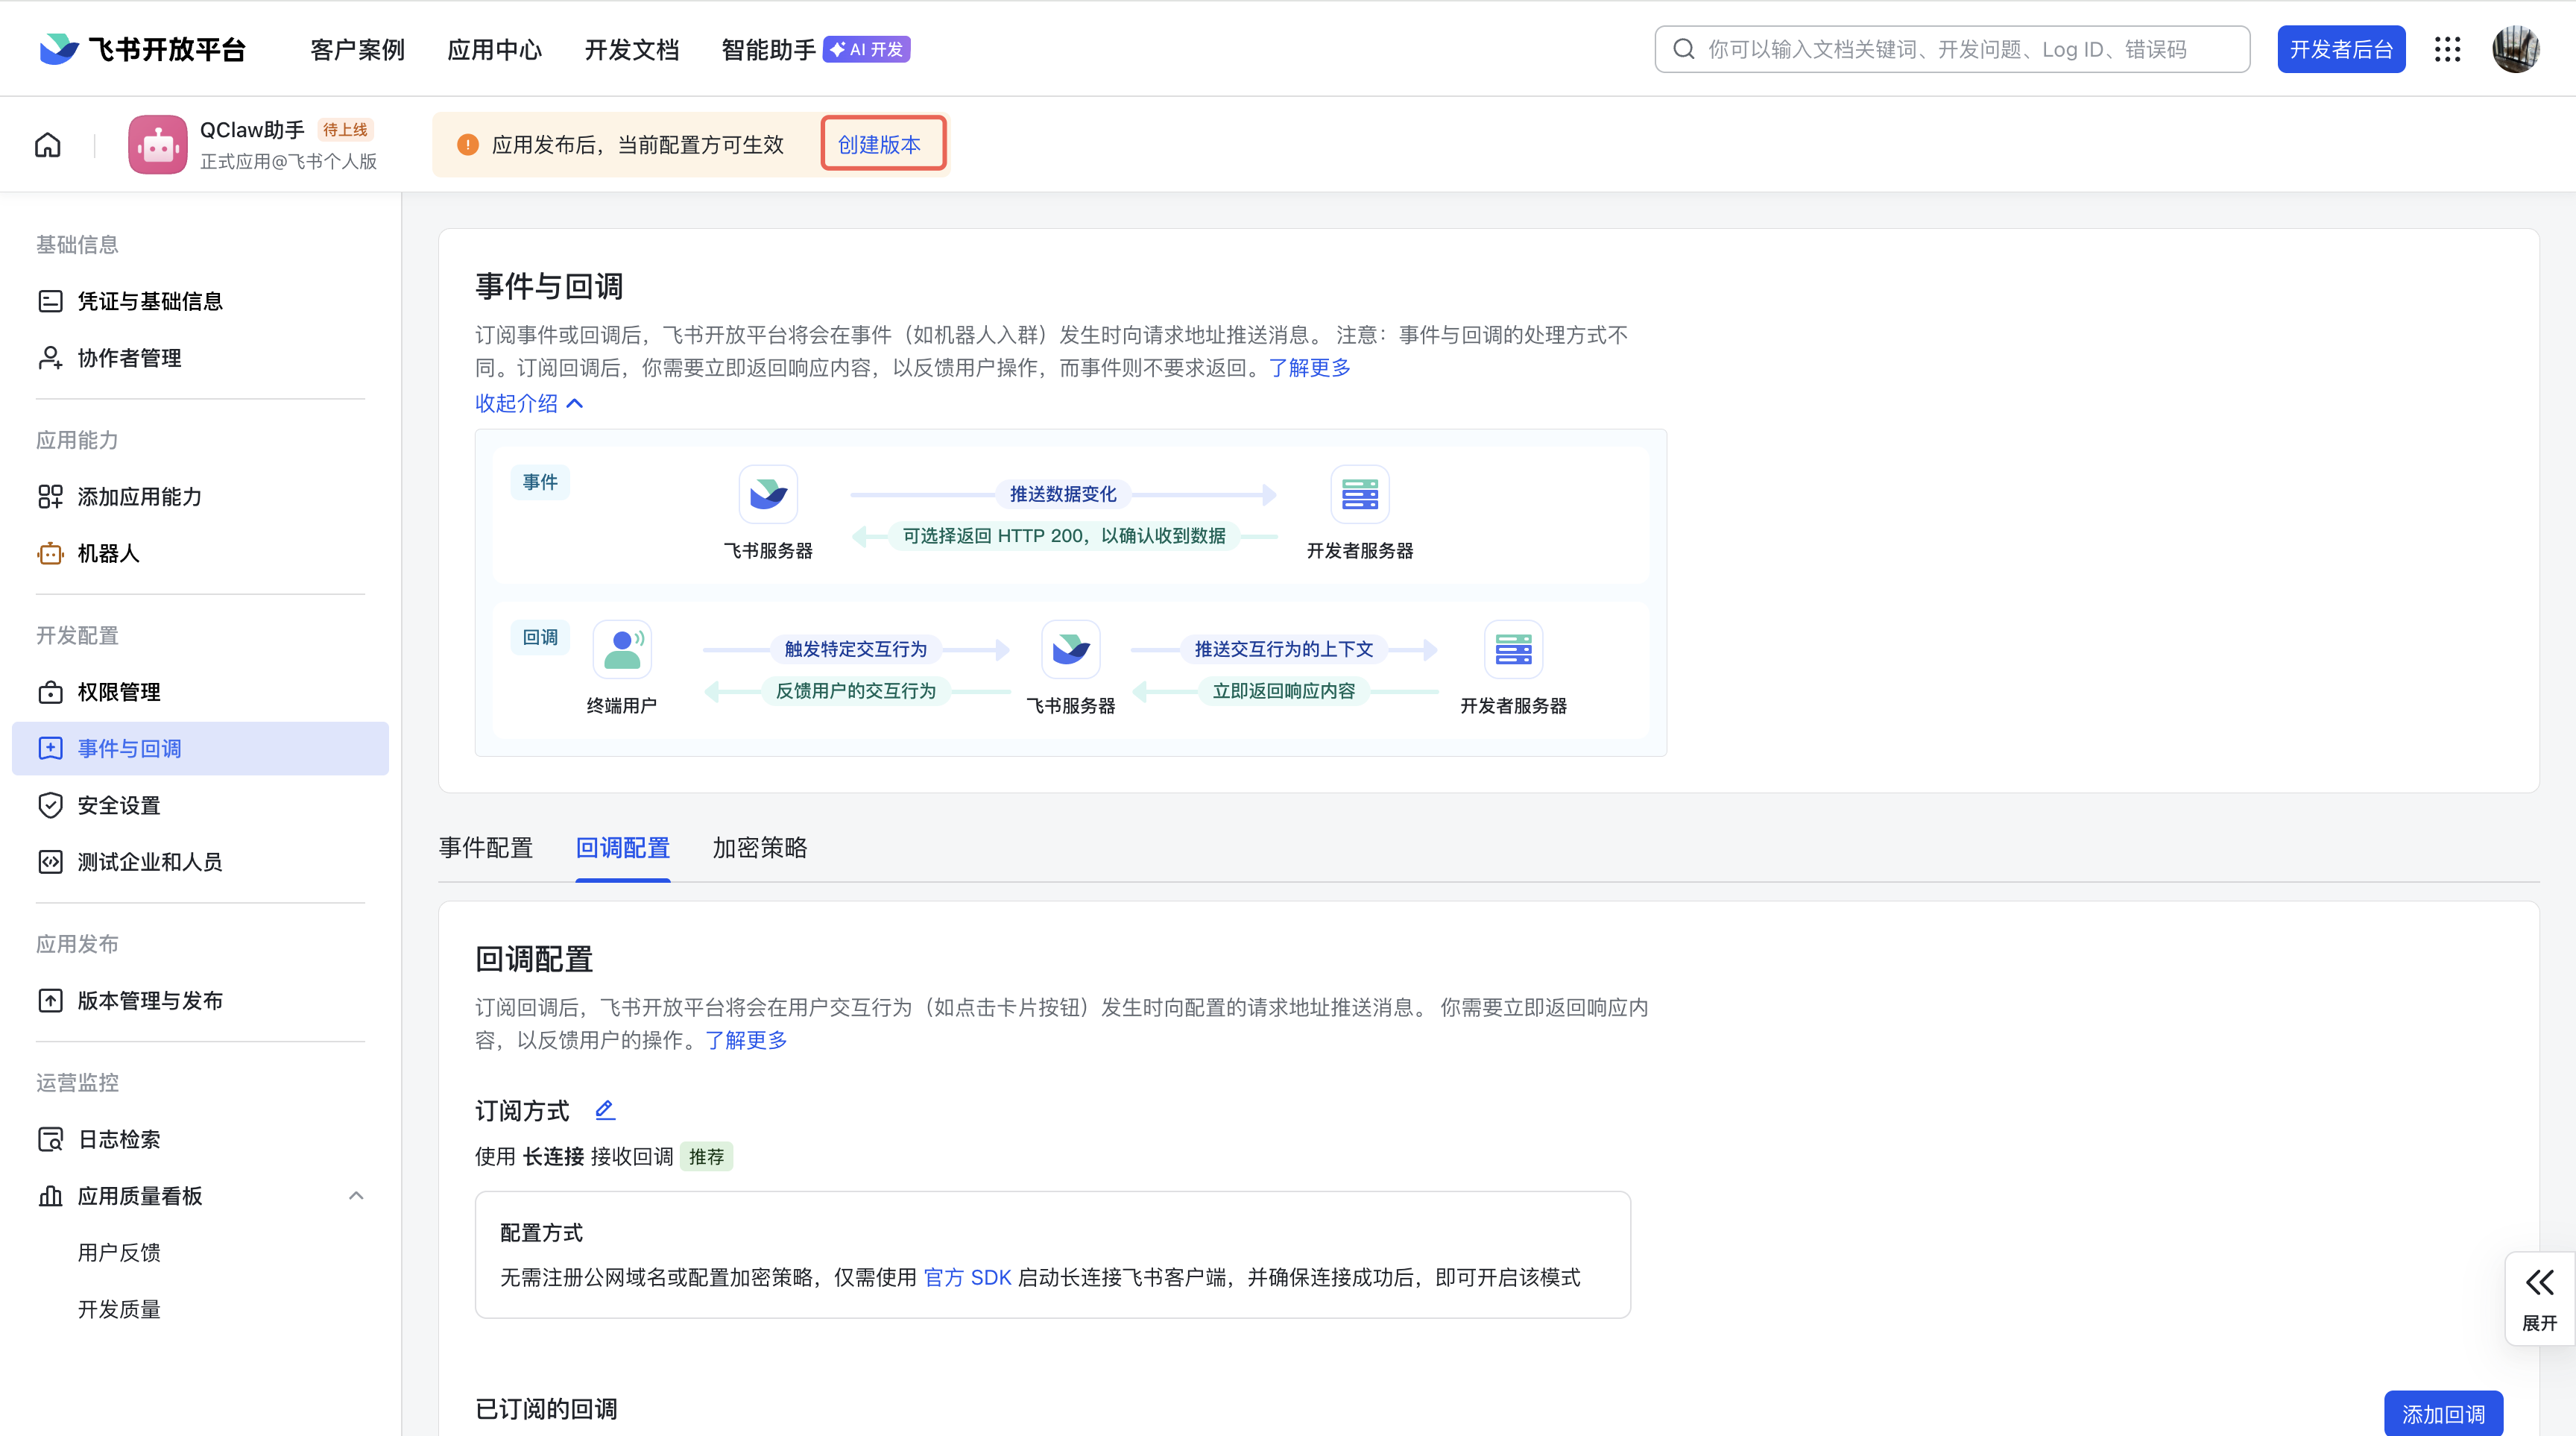
切换到「回调配置」页签,选择订阅方式为「使用 长连接 接收事件」,再点击「保存」
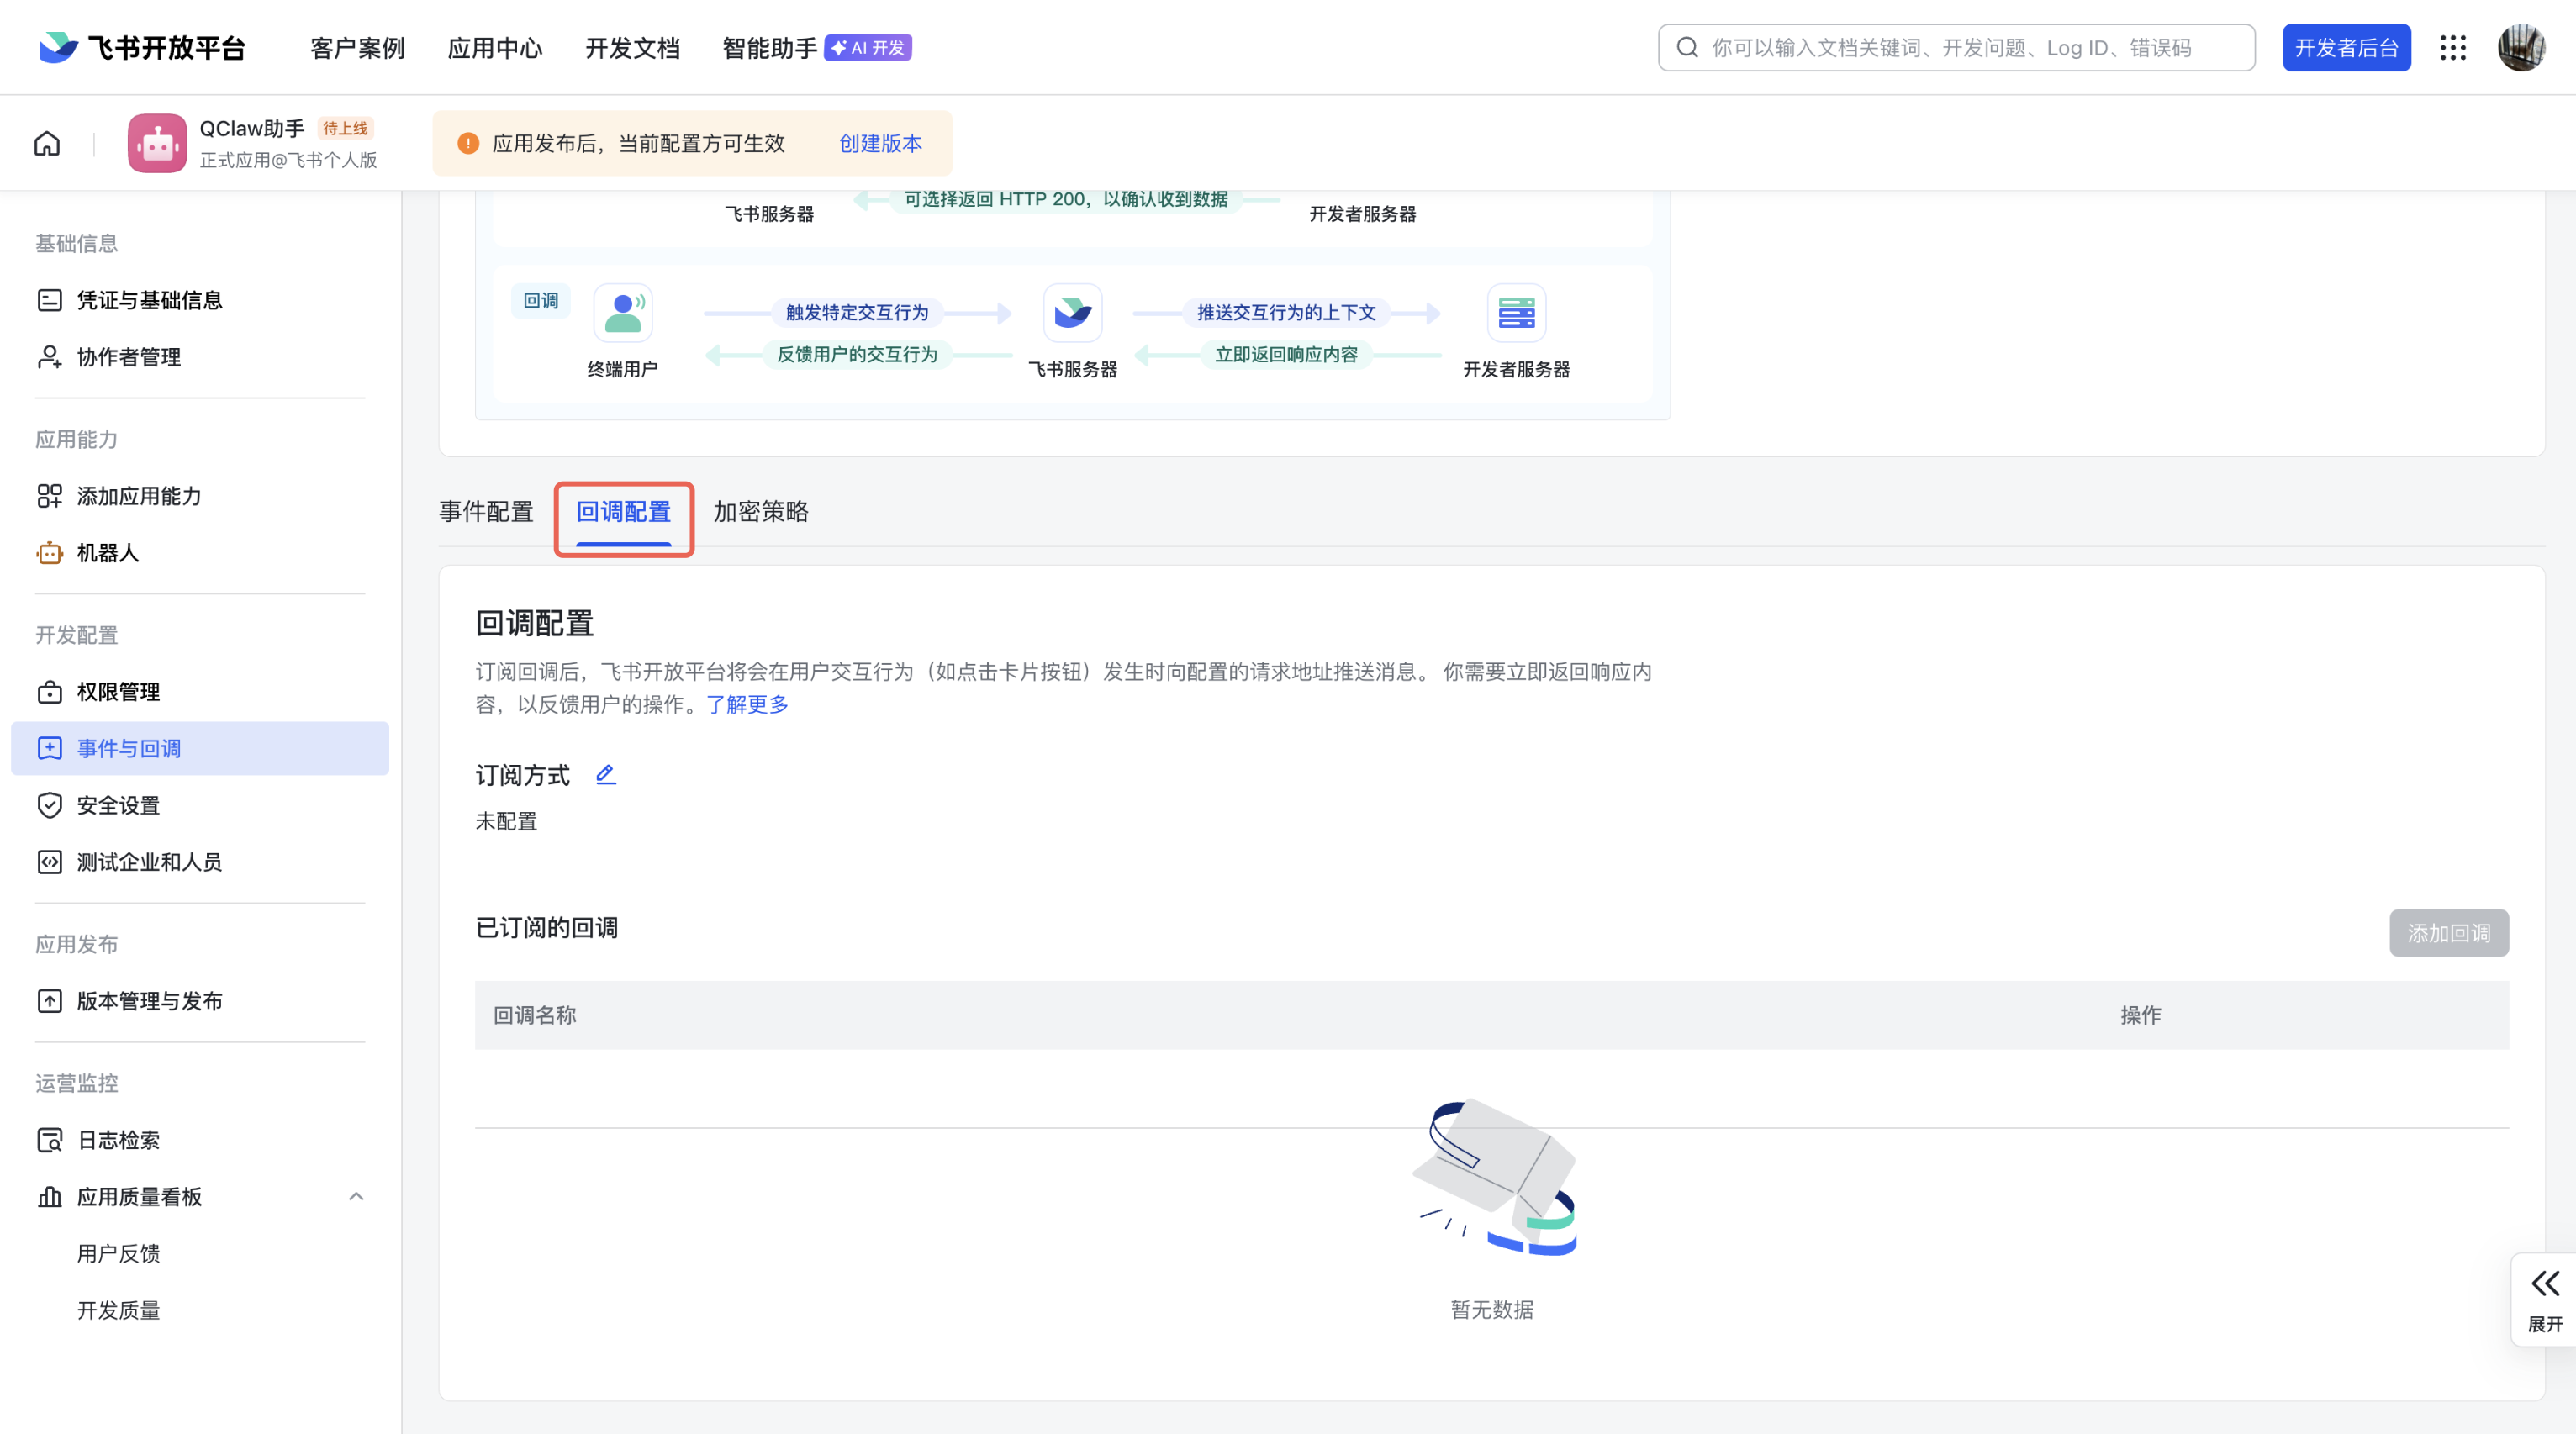
在「回调配置」区域,点击「添加回调」,搜索「卡片回传交互」,点击「添加」,

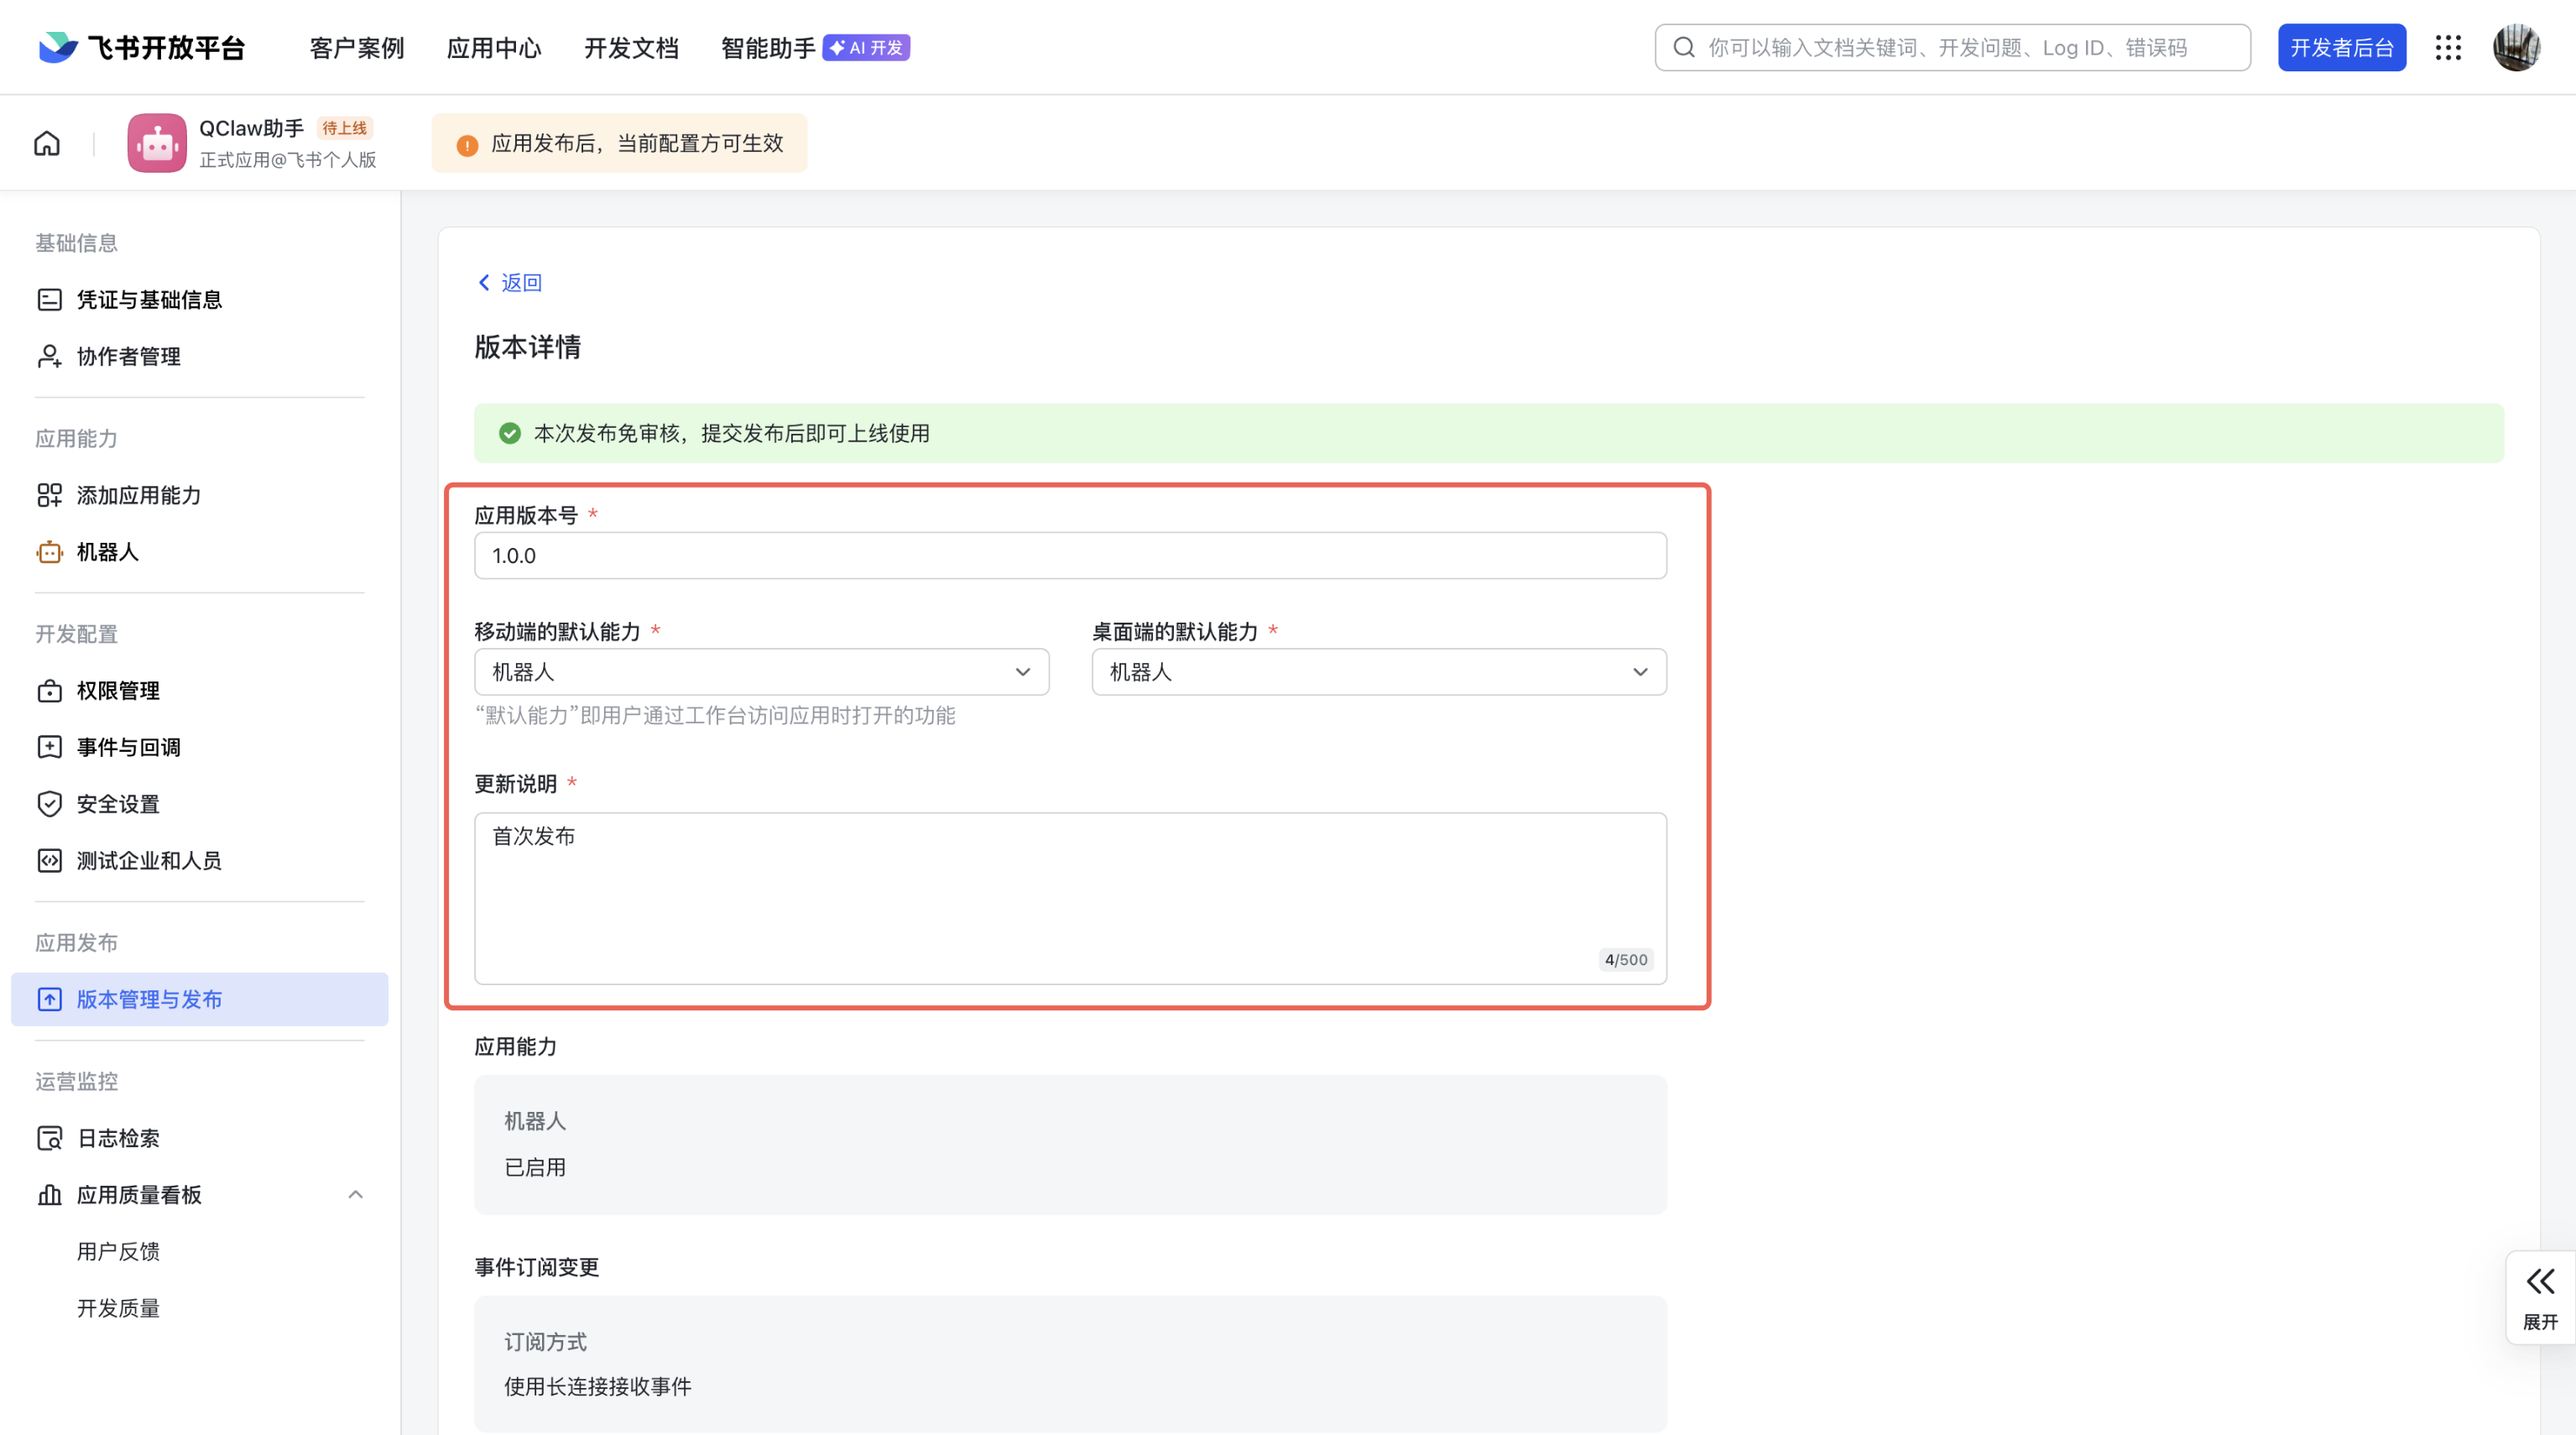
点击页面上方的「创建版本」按钮。在弹出的窗口中填写版本号(示例:1.0.0)、版本描述(首次发布),点击「确定」创建版本。
4、开始使用
飞书列表中「开发者小助手」会推送“应用审批通路,已发布成功”,点击「打开应用」开始使用。
或在飞书的搜索框中,输入刚才创建的机器人名称进行搜索。点击机器人进入对话窗口。
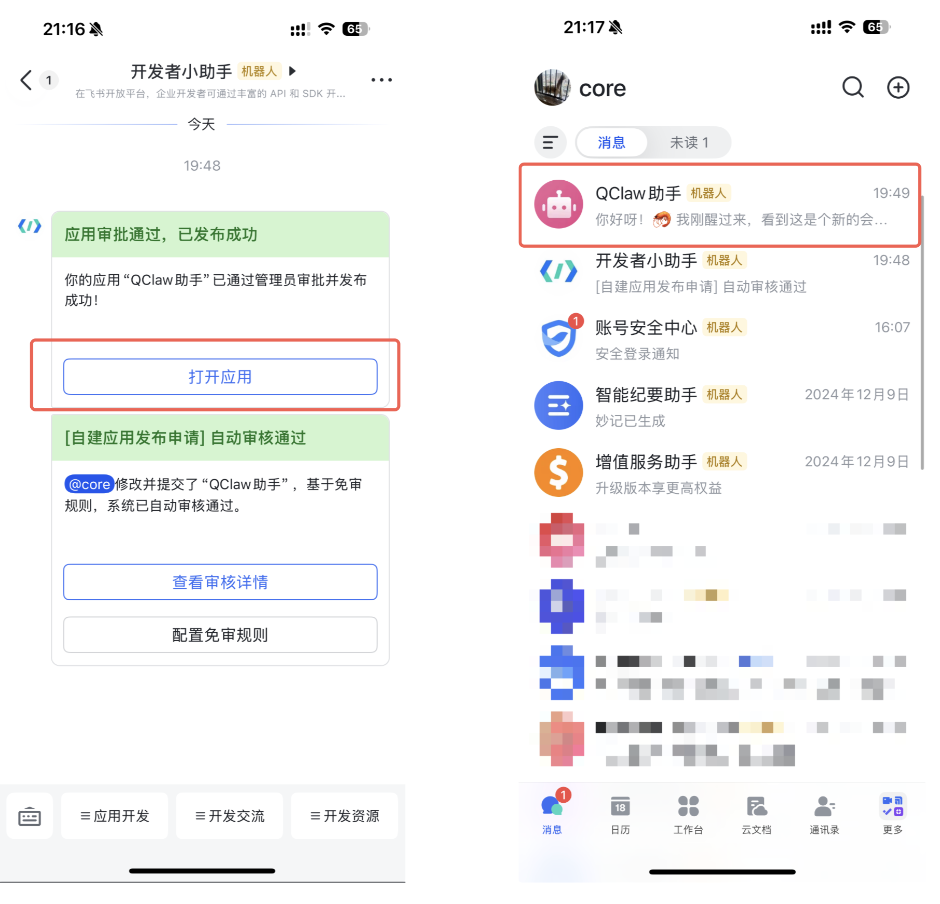
发送一条简单消息(例如“你好”)进行连通测试。如果配置正确,QClaw 会接收到消息并在飞书中返回回复。

5、结束语
最后感谢🙏 QClaw 产品文档编写组,这里的内容基本来源于 QClaw 的文档